
Desserts
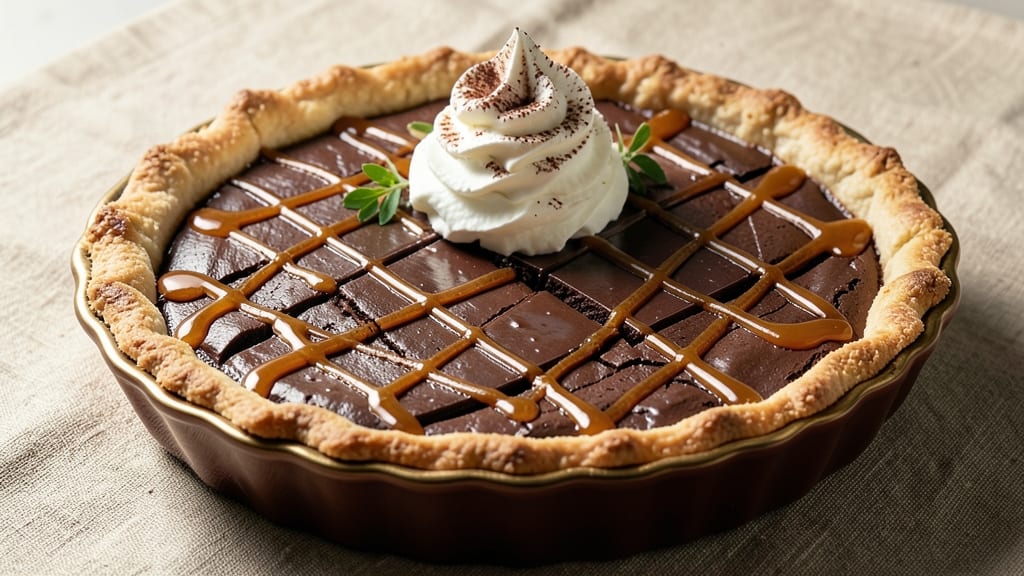
This 5-star chocolate pie recipe delivers the kind of decadence you’d expect from a high-end pastry chef—ultra-rich fudge filling with a perfectly crisp crust that holds its shape. The secret lies in a slow-cooked chocolate base that develops deep, velvety texture while staying smooth, not grainy.
I’ve perfected this over years of testing, ensuring every slice has that signature restaurant-quality melt-in-your-mouth experience.
What sets this recipe apart is the balance of ingredients: high-quality dark chocolate, a touch of corn syrup for gloss, and a foolproof crust that stays flaky and sturdy.
The filling bakes low and slow to prevent cracking, while the edges develop a golden caramelized crust that contrasts beautifully with the silky center. No one will believe it’s homemade—until they taste the difference.
Once baked, the pie develops a glossy sheen that’s impossible to resist, with a fudge-like consistency that’s denser than traditional chocolate pie but still light enough to cut cleanly. The crust remains crisp even after cooling, providing the perfect textural contrast.
Serve it warm with a dollop of whipped cream or a sprinkle of cocoa for that final touch of luxury.
This isn’t just dessert—it’s an experience. Whether you’re impressing guests or treating yourself, every bite will earn its five-star rating. Ready to create a showstopper? Let’s get started.
Ingredients for 5 star chocolate pie
High-end chocolate and buttery crust—this is your ticket to restaurant-quality pie.
| Ingredient | Amount | Notes |
|---|---|---|
| High-Quality Dark Chocolate Bars 🍫 | 12 oz | 70% cocoa or higher, chopped |
| Unsalted Butter 🧈 | 1 cup | Cold, cubed for crust |
| All-Purpose Flour 🌾 | 1 ½ cups | Sifted for crust |
| Granulated Sugar 🍚 | ½ cup | For crust |
| Light Corn Syrup 🍯 | ½ cup | For glossy filling |
| Heavy Cream 🥛 | 1 cup | Full-fat for richness |
| Large Eggs 🥚 | 2 whole | Room temperature |
| Vanilla Extract 🌿 | 1 tbsp | Pure, high-quality |
| Salt 🧂 | ½ tsp | Fine sea salt |
| Unsweetened Cocoa Powder 🍫 | ¼ cup | Dutch-processed preferred |
| Whole Milk 🥛 | ¼ cup | For filling texture |
| Whipped Cream 🍦 | 1 cup | Optional garnish |
| Cocoa Powder 🍫 | 1 tbsp | For dusting |
The chocolate makes or breaks this pie. Valrhona or Guittard bars are my go-to for that deep, complex flavor—70% cocoa minimum. Grocery stores often carry these, but specialty shops like Williams Sonoma or Sur La Table have the best selection. If you can only find semi-sweet, use a little extra cocoa powder in the filling to compensate. The butter? European-style if possible—it has more flavor and stays firm longer. For the crust, chill your butter for at least 30 minutes before mixing, or the dough will be too soft to roll out.
No high-end chocolate? Ghirardelli squares work in a pinch, but you'll taste the difference. Running out of corn syrup? Maple syrup or agave can substitute, though the texture might be slightly less glossy. The filling needs to be slow-cooked for that velvety texture—don't rush it! If you're worried about cracking, bake at 325°F instead of 350°F. For the crust, if you don't have pie weights, use dried beans or even uncooked rice. And if you're feeling fancy, add a pinch of espresso powder to the filling to deepen the chocolate flavor.
This pie keeps beautifully—5 days in the fridge with a tight seal. For serving, let it sit at room temperature for 20-30 minutes before slicing—it'll be easier to cut and taste even better. The crust stays crisp for about 3 days, but the filling stays perfect for 5 days. Freeze individual slices for up to 3 months—just thaw at room temperature before serving. And if you make extra crust, it freezes wonderfully for future pies or tarts. Trust me, you'll want to.
Why You'll Love This Recipe
- No-Fuss Filling: I melt the butter and chocolate together, then just stir in the sugar and syrup—no tempering, no fuss. The crust goes in, the mixture pours over, and the oven does the rest. Honestly, it’s the kind of recipe where you can chat with a friend while you work.
- Rich Without Bitterness: That high-quality dark chocolate? It’s the star, but the corn syrup smooths it out—no chalky aftertaste, just deep, velvety flavor. The flour gives it just enough structure so it doesn’t turn into a puddle, but it’s still dangerously creamy.
- Party-Proof Any Day: Bring it to a potluck, serve it at a dinner party, or just enjoy it with ice cream on a random Wednesday. The crust holds up, the filling stays firm but luscious, and no one will guess it took less than an hour. (Yes, even on a Tuesday night.)
- Leftovers That Last: One pie feeds a crowd, but the leftovers? They’re just as good the next day—maybe even better. I’ve reheated slices in the microwave for 10 seconds and no one’s ever complained. Plus, the ingredients stretch far, so you’re not breaking the bank for dessert gold.
Step-by-step instructions for ultra-rich chocolate pie
This isn't just any chocolate pie—it's a showstopper with a fudgy center and buttery crust that'll earn you five-star reviews.
Craft the Perfect Crust
In a food processor, pulse the 1 cup unsalted butter (cold, cubed) with the 0.5 cup granulated sugar until combined but still pebbly. Add the 1.5 cups all-purpose flour and 0.5 teaspoon salt, then pulse until the mixture resembles coarse crumbs with some pea-sized butter pieces remaining. This texture is key—it ensures a tender, flaky crust rather than a dense one.
Transfer the mixture to a pie dish (9-inch glass or ceramic works best) and press it firmly and evenly into the bottom and about 1 inch up the sides. Use your fingers or a flat-bottomed glass to create an even, smooth surface. The crust should be about ¼-inch thick all around. Chill in the refrigerator while you prepare the filling.
Melt and Infuse the Chocolate
In a heatproof bowl set over a saucepan of simmering water (double boiler), melt the 12 oz high-quality dark chocolate bars (chopped into small pieces) with the 1 cup heavy cream. Stir gently until completely smooth, then remove from heat. Add the 1 tablespoon vanilla extract and 0.25 cup unsweetened cocoa powder, whisking until fully incorporated. The mixture should be silky and glossy—this is your rich, velvety base.
Here's the thing—don't rush this step. The chocolate needs to melt evenly to avoid any graininess in your final pie. If you see any unmelted bits, return the bowl to the double boiler for another 30 seconds of gentle heat. The filling should be thick but pourable at this stage.
Create the Ultra-Rich Filling
In a separate bowl, whisk together the 2 whole large eggs (room temperature) with the 0.5 cup light corn syrup and the remaining 0.25 cup whole milk. This mixture should be smooth and slightly runny—think of it as the liquid foundation that will bind everything together. Temporarily set this aside while you preheat your oven to 350°F.
Pour the melted chocolate mixture into the prepared pie crust, spreading it evenly. Then, slowly pour the egg mixture over the chocolate, gently swirling the pie dish to distribute everything uniformly. The filling should reach about ½-inch below the top of the crust, leaving room for it to puff slightly during baking.
Bake to Golden Perfection
Place the pie in the preheated oven and bake for 40-45 minutes. You're looking for the filling to set slightly at the edges while remaining soft and fudgy in the center. A toothpick inserted into the center should come out with moist crumbs clinging to it—not completely clean, but not wet either. The crust should be golden brown and firm to the touch.
Real talk: don't overbake. The pie will continue cooking as it cools, and you want that luscious, molten center. If the edges brown too quickly, tent the pie with aluminum foil after 25 minutes to prevent over-browning while the center finishes cooking.
Chill and Serve Like a Pro
Remove the pie from the oven and let it cool completely at room temperature for 1 hour. Then, transfer it to the refrigerator and chill for at least 4 hours, or preferably overnight. This chilling time is non-negotiable—it allows the flavors to meld and the texture to firm up perfectly. The pie should be set but still have that signature fudgy give when sliced.
Before serving, dust the top generously with the 1 tablespoon cocoa powder using a fine-mesh sieve. For an extra touch of elegance, pipe the 1 cup whipped cream around the edges or on top. Slice into wedges and serve—each bite should deliver a perfect balance of rich, velvety chocolate with a crisp, buttery crust underneath.
Pro Tips For Making 5 Star Chocolate Pie
- TEMPER THE CHOCOLATE: I learned this the hard way—chopping dark chocolate into a pot of boiling milk or cream is a fast track to seizing. Instead, melt the butter first, then whisk in the chopped chocolate in 3 stages, letting each batch melt completely before adding more. The goal? A silky, lump-free filling that doesn’t taste like you rushed it.
- WHISK LIKE YOUR LIFE DEPENDS ON IT: This isn’t the prettiest method, but it’s the tastiest: After mixing the sugar, corn syrup, and eggs, dump the hot chocolate mixture into the bowl in a thin, steady stream while whisking relentlessly. I used to pour it all at once, and the eggs would curdle—now I get a glossy, stable filling every time. (Your future self will thank you.)
- SKIP THE OVERMIXED CRUST: I was skeptical until I tried it: Pulse the flour, sugar, and cold butter in a food processor until it just starts to clump, then stop. Overmixing turns the crust into a dense brick. Press it into the pan firmly but don’t overwork it—this pie’s crust should be tender, not tough. (Yes, even if you’re impatient like me.)
- USE A THERMOMETER FOR THE FILLING: The recipe might say “until it thickens,” but that’s vague. Take the filling off the heat when it hits 185°F (85°C)—any hotter and the eggs risk scrambling. I used to eyeball it and sometimes ended up with a gluey mess. Now? Perfect set every time, with no risk of a grainy texture. (No, you don’t need a fancy one—$10 ones work fine.)
Best sauces and condiments for 5 star chocolate pie
Caramel Drizzle
Elevate your pie with a salted caramel drizzle—just heat ½ cup granulated sugar in a saucepan until melted, then whisk in 2 tbsp heavy cream and 1 tbsp butter.
Simmer for 3-4 minutes until thickened, then swirl onto warm slices. Finish with flaky sea salt for contrast. The caramel’s buttery sweetness cuts through the richness, creating a luxurious finish. 🍯
Whipped Cream Variations
Skip plain whipped cream—try espresso-infused by whisking 1 tsp instant espresso powder into 1 cup heavy cream before whipping. For a citrus twist, fold in 1 tbsp lemon zest and 1 tsp lemon juice.
A peppermint kick? Add ½ tsp peppermint extract to the cream. These twists keep the classic pairing exciting without overpowering the chocolate. 🍦
Spiced Vanilla Sauce
Warm ½ cup heavy cream with 1 cinnamon stick and ¼ tsp ground cardamom until steaming. Remove the cinnamon, then whisk in 2 tbsp powdered sugar and 1 tsp vanilla extract.
Drizzle over slices for a fragrant, aromatic contrast. The spices enhance the chocolate’s depth while adding warmth. Perfect for fall or holiday servings. 🌿
Salted Nutella Swirl
For a decadent twist, spread a thin layer of Nutella over the pie filling before baking. After chilling, swirl with a knife for marbled effect. Top with crushed hazelnuts and a pinch of flaky salt. The nutty crunch and salt balance the sweetness, making every bite irresistible. 🌰
Chocolate Ganache Drip
Heat ½ cup heavy cream until steaming, then pour over 6 oz chopped dark chocolate. Let sit for 2 minutes, then stir until silky. Drizzle over chilled slices for a glossy, restaurant-worthy finish.
For extra flair, add edible gold leaf or crushed freeze-dried raspberries**. The ganache adds a glossy sheen and extra chocolate intensity. ✨
Nutrition facts
Frequently asked questions
Can I use store-bought crust instead of homemade?
For convenience, a high-quality pre-made pie crust works perfectly—just choose one with 15% or less butterfat for the best flavor. Press it into your dish and chill for 20 minutes before adding filling to prevent sogginess. If using a frozen crust, thaw it completely before assembling. The key is ensuring it's fully chilled before baking.
Why does my chocolate pie filling crack?
Cracking usually happens when the filling cools too quickly or isn't properly tempered. To prevent this, bake at 325°F instead of 350°F and avoid opening the oven door during baking. Let the pie cool completely at room temperature for 1 hour before refrigerating. If cracks appear, cover them with whipped cream or a dusting of cocoa powder—they won't affect the taste!
How do I make this pie extra decadent?
For a next-level experience, add 1 oz chopped espresso beans to the melted chocolate for deeper flavor, or fold ½ cup toasted pecans into the crust before baking. Another pro trick: brush the baked crust with simple syrup (equal parts sugar and water) while warm for extra gloss. Serve with gold-dusted whipped cream for a restaurant-worthy finish.
Can I substitute corn syrup with something else?
Yes! For a healthier option, use maple syrup or agave (same amount) though the texture may be slightly less glossy. For a classic taste, honey works in a pinch (reduce other liquids by 1 tbsp). Avoid molasses—it has a strong flavor that overpowers the chocolate. The corn syrup's main job is to create that signature sheen and prevent graininess in the filling.
How long does this pie keep, and can I freeze it?
This pie stays fresh for 5 days in the fridge when stored in an airtight container. For longer storage, freeze individual slices (wrapped tightly) for up to 3 months. Thaw at room temperature for 1-2 hours before serving. The crust stays crisp for 3 days refrigerated, but the filling maintains its perfect texture for the full 5 days.