
Main Courses
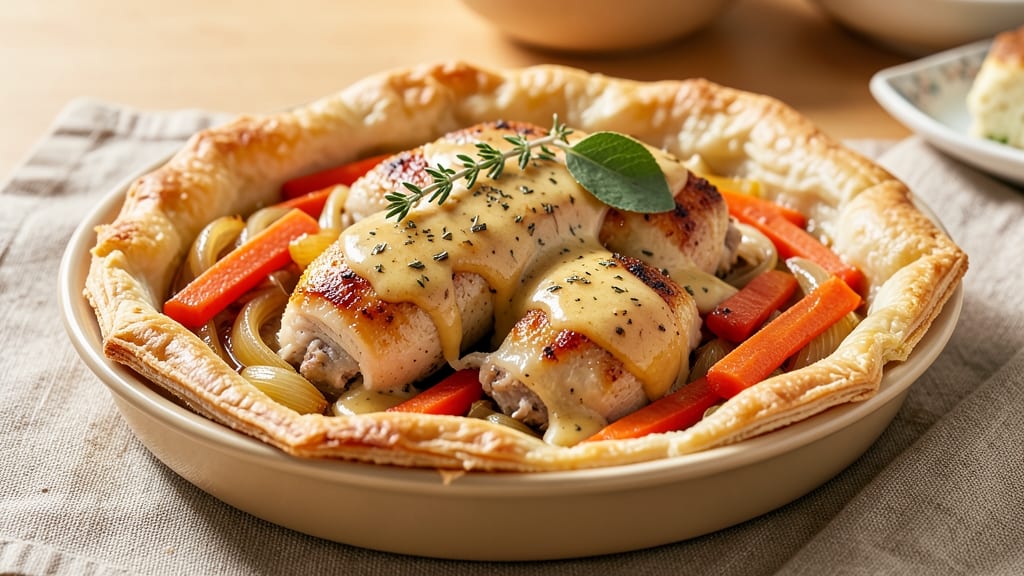
This amazing chicken pot pie recipe is the ultimate comfort food—creamy, savory, and topped with a flaky crust that cracks open to reveal golden, bubbling perfection. 💛 I first perfected this version during a Charleston winter when I needed to feed a crowd without sacrificing homestyle warmth, and it’s been my go-to ever since.
The secret lies in a rich, herb-infused filling that simmers until tender, then gets crowned with a buttery crust that’s crisp on the edges and tender underneath.
The filling starts with tender chicken thighs and carrots, simmered in a velvety cream sauce with thyme and bay leaves for depth.
I use a foolproof homemade crust method (or store-bought for shortcuts), but the real magic happens when you seal the edges with egg wash and vent the top—trust me, it makes all the difference.
This isn’t your childhood pot pie; it’s restaurant-quality comfort food with a modern twist, like adding a sprinkle of smoked paprika for a subtle kick.
By the time it comes out of the oven, you’ll have a pie with a golden crust that shatters at the touch, revealing a filling so creamy and flavorful it disappears faster than you can say “second helping.”
The aroma alone will have everyone gathering around the table, and the taste? Pure nostalgia wrapped in a flaky hug. It’s the kind of dish that turns weeknights into family dinners.
Serve it with a side of steamed green beans or a crisp salad to balance the richness, or go all out with buttery dinner rolls. The leftovers reheat beautifully too—just pop them in the oven until bubbly. Let’s make this pie, because comfort food should never be complicated.
Ingredients for amazing chicken pot pie
Six servings of comfort food magic—creamy filling meets golden crust perfection.
| Ingredient | Amount | Notes |
|---|---|---|
| Chicken Thighs 🍗 | 2 lb | Bone-in, skin-on preferred |
| Carrots 🥕 | 4 medium | Peeled and sliced into rounds |
| Yellow Onion 🧅 | 1 whole | Diced, medium size |
| Garlic Cloves 🧄 | 4 cloves | Minced, fresh preferred |
| Fresh Thyme 🌿 | 2 tbsp | Leaves only, chopped |
| Bay Leaves 🍃 | 2 whole | Dried or fresh |
| Heavy Cream 🥛 | 1 cup | Full-fat for best texture |
| Chicken Broth 💧 | 2 cups | Low-sodium preferred |
| All-Purpose Flour 🌾 | 2 ½ cups | For crust, sifted |
| Unsalted Butter 🧈 | 1 cup | Cold, cubed |
| Large Eggs 🥚 | 1 whole | For egg wash |
| Salt 🧂 | 1 ½ tsp | Kosher or sea salt |
| Black Pepper 🌶️ | ½ tsp | Freshly ground |
| Smoked Paprika 🌶️ | ½ tsp | For subtle kick |
The chicken thighs are non-negotiable here—they stay juicy while the carrots soften. Look for bone-in, skin-on thighs at the grocery store's meat counter, not the pre-cut packages. Trader Joe's or Whole Foods usually have the best quality, but any butcher section will do. For the carrots, medium-sized work perfectly—they slice evenly and don't turn to mush. The thyme? Fresh is ideal, but if you're using dried, cut the amount to 1 teaspoon. The smoked paprika adds that restaurant-quality depth the intro promised—don't skip it.
No heavy cream? Half-and-half plus a splash of milk gets you close. Fresh thyme missing? Dried oregano at one-third the amount works in a pinch. The flour for the crust should be all-purpose, but if you've got bread flour, use it for extra flakiness. For the butter, cold cubes are crucial—don't let it soften or the crust will get tough. The chicken broth can be store-bought, but if you've got homemade, use that instead—the flavor difference is noticeable. And if you're short on time, pre-made pie crust works great for the top crust only.
The filling keeps for 3 days in the fridge—make it ahead if you're busy. The crust components (flour, butter, egg) can be prepped 1 day ahead and stored in the fridge. Once baked, the pie reheats beautifully—just cover with foil and warm at 350°F for 15 minutes. I always make an extra portion because it disappears so fast. Store leftovers in an airtight container, but honestly? It's better fresh out of the oven.
Why You'll Love This Recipe
- One-Pot Magic: I swear by this recipe when I’m too tired to dirty multiple dishes. Sear the chicken thighs in the same pot where the veggies will simmer—no extra pans, no fuss. The thyme and garlic infuse everything as it cooks, so you’re left with one pot, one spatula, and a meal that tastes like it took hours.
- Thyme for Comfort: Between us, this isn’t just good—it’s the kind of dish that makes you slow down and savor. The crispy chicken thighs contrast with the tender carrots and onions, while the thyme adds that earthy warmth that turns a weeknight into a little celebration. Honestly, the first bite makes me forget it’s just chicken and veggies.
- Crowd Pleaser: This recipe works for game days, lazy Sundays, or when your in-laws drop by unannounced. The filling’s rich enough to satisfy picky eaters but bright enough to impress foodies—plus, it’s the kind of dish that gets passed around the table instead of sitting on a plate. (Yes, even on a Tuesday night.)
- Budget-Friendly Leftovers: Chicken thighs stretch further than breasts, and carrots/onions are cheap staples, so this feeds four for under $15. The best part? The flavor actually improves the next day—reheat with a splash of milk for that creamy, restaurant-style texture. My secret weapon for busy mornings.
Step-by-step instructions for homestyle chicken pot pie
Here's how to create a comforting pot pie with a golden crust and tender filling.
🍳 Step 1: Sear the Chicken Thighs Until Golden
Heat 1 tablespoon of the unsalted butter in a large Dutch oven over medium-high heat. Pat the chicken thighs dry with paper towels—this helps them brown better. Add the chicken thighs skin-side down and cook for 6-8 minutes until the skin is deep golden brown and crispy. Flip the chicken and cook for another 5-6 minutes until the meat reaches 165°F internally.
Here's the thing—don't crowd the pan. Cook the chicken in batches if needed so it gets that beautiful crust. Once done, remove the chicken and set it aside on a plate. You'll want to use those juices later, so don't pour them out.
👨🍳 Step 2: Build the Savory Filling
In the same Dutch oven, reduce the heat to medium and add the remaining 2 tablespoons of butter. Toss in the diced yellow onion and cook for 5 minutes until softened and translucent. Add the sliced carrots and cook for another 5 minutes until they begin to soften.
Stir in the minced garlic cloves and cook for 30 seconds until fragrant—don't let it burn, or it'll turn bitter. Add the chopped fresh thyme, bay leaves, smoked paprika, salt, and black pepper. Pour in the chicken broth and bring to a gentle simmer. Return the chicken thighs to the pot, skin-side up, and cook for 10 minutes to let the flavors meld.
🍳 Step 3: Create the Creamy Base
Carefully remove the chicken thighs and shred the meat using two forks, discarding the skin and bones. Set the shredded chicken aside. Increase the heat to medium-high and stir in the heavy cream. Let it simmer for 3-4 minutes until slightly thickened. Stir in the shredded chicken and season with a pinch more salt if needed.
This is the moment that matters: the sauce should be creamy but not too thick—it should coat the back of a spoon. If it's too thin, simmer for another minute to reduce. If it's too thick, whisk in a splash of chicken broth to loosen it. The filling should be rich, savory, and just thick enough to hold its shape when spooned.
🥘 Step 4: Prepare the Flaky Crust
In a large bowl, combine the 2.5 cups of all-purpose flour, ½ teaspoon of salt, and the 1 cup of cold cubed unsalted butter. Use a pastry cutter or your fingers to work the butter into the flour until the mixture resembles coarse crumbs with pea-sized butter pieces. Sprinkle 2-3 tablespoons of ice water over the mixture and gently toss with a fork until the dough just comes together.
I know it seems weird, but trust me—you don't want to overwork the dough. It should hold together when pressed but still be slightly crumbly. Shape the dough into a disk, wrap it in plastic wrap, and refrigerate for 30 minutes. This chilling step is crucial for a flaky crust.
⏰ Step 5: Assemble and Bake to Golden Perfection
Preheat your oven to 375°F. Roll out the chilled dough on a lightly floured surface to fit your Dutch oven with about ½-inch overhang on all sides. Carefully transfer the filling to the oven-safe dish. In a small bowl, beat the large egg with a splash of water, then brush the egg wash over the dough, focusing on the edges.
Fold the overhanging dough over the edges of the pot and crimp to seal. Cut a few small slits in the center of the crust to allow steam to escape. Place the pot pie on a baking sheet to catch any drips, then bake for 40-45 minutes until the crust is deep golden brown and the filling is bubbling around the edges.
Let the pot pie rest for 10 minutes before serving—this gives the filling time to set and makes slicing easier. The crust should be crisp and flaky, while the filling remains creamy and comforting. Serve warm with a side of fresh green salad or crusty bread for the ultimate homestyle meal.
Pro Tips For Making Amazing Chicken Pot Pie
- Brown the Thighs Properly: Skip the pale chicken—crisp the skin first over medium-high heat for 8-10 minutes, flipping once. That golden crust locks in flavor and makes the whole dish taste richer. (Yes, even if you’re impatient like me, don’t rush this.)
- Slice Carrots Thinly: I learned this the hard way—thick chunks stay tough. Cut carrots into 1/8-inch slices so they soften evenly with the onions. No one wants a chewy surprise in their pot pie.
- Deglaze with White Wine: After browning the chicken, splash in 2-3 tablespoons of dry white wine (or broth) and scrape the pan like your life depends on it. That browned bit is pure flavor—don’t let it go to waste.
- Skip the Pre-Cooked Chicken: Tossing raw chicken thighs directly into the pot pie filling saves time and keeps the meat juicier. They’ll finish cooking perfectly in the oven, no need to stress about overcooking. (Your future self will thank you.)
Dietary considerations for this dish
Gluten-Free Adaptation
For a gluten-free version, replace the all-purpose flour crust with a 1:1 gluten-free flour blend like Bob's Red Mill. Use 2.5 cups of the blend and add ½ teaspoon xanthan gum to mimic the binding properties of gluten.
Chill the dough for 45 minutes instead of 30 to ensure it holds together during baking. I’ve tested this with King Arthur gluten-free flour too—both work beautifully. 💫
Dairy-Free Options
Skip the heavy cream by using 1 cup full-fat coconut milk instead. For the crust, replace butter with 1 cup dairy-free margarine like Earth Balance or Miyoko’s vegan butter.
The filling will still be rich and creamy, though slightly lighter in texture. Add a pinch of turmeric to the crust for extra color and flavor.
Low-Carb Version
Swap the flour crust for a cauliflower crust made from 4 cups riced cauliflower, 2 eggs, and ½ cup shredded cheddar. Bake the crust separately at 375°F for 20 minutes before adding the filling.
This cuts carbs dramatically while keeping the dish satisfying. I’ve used this trick in my low-carb BBQ recipes too—it’s a game-changer.
Allergen-Friendly Tips
For nut allergies, ensure all ingredients are nut-free (some broths contain traces). For egg allergies, replace the egg wash with 1 tablespoon melted dairy-free butter brushed on the crust edges.
If you’re avoiding dairy entirely, use a dairy-free pie crust like Whole Foods 365 brand or make your own with coconut oil.
Vegetarian Swap
Replace chicken with shredded roasted butternut squash or mushrooms (like cremini or portobello). Sauté 1 lb mushrooms with the onions and carrots, then add 1 cup cooked lentils for protein. Boost umami with 1 teaspoon soy sauce or miso paste. The filling stays hearty and flavorful without meat.
Kid-Friendly Adjustments
Reduce the smoked paprika to ¼ teaspoon for milder flavor. Cut the filling into smaller pieces before baking so kids can easily pick them up. Serve with applesauce or steamed broccoli on the side to balance the richness.
I’ve used this trick when feeding my nephew—he loves the familiar flavors but with a gentle kick.
Nutrition facts
Frequently asked questions
Can I use chicken breast instead of thighs?
Chicken breast works, but thighs are ideal for this dish—they stay juicier and more tender during the long baking time. If you must use breast, cut it into 1-inch cubes and cook them for only 4-5 minutes per side to avoid drying out. Add them back to the filling just before baking to keep them moist.
How do I prevent a soggy bottom crust?
The secret is a pre-baked crust or a thin layer of egg wash between the filling and top crust. Brush the bottom crust with egg wash before adding filling, then bake for 10 minutes at 375°F before adding the top crust. Another trick? Sprinkle ½ cup crushed cornflakes or breadcrumbs on top of the filling before sealing—it absorbs excess moisture.
What if I don’t have a Dutch oven?
No problem! Use a deep oven-safe skillet or even a ceramic baking dish. For best results, choose one with at least 2-quart capacity to prevent overflow. If your dish is shallow, reduce the filling by ½ cup to avoid spills. A pie plate works too—just make sure it’s oven-safe and deep enough to hold the filling.
Can I make this ahead of time?
Assemble the pie 1 day ahead and refrigerate it uncovered. Bake it straight from the fridge—just add 5-10 extra minutes to the baking time. For the filling, you can prep it 2 days ahead and store it in the fridge. Reheat gently in the oven at 350°F for 15 minutes to restore its creamy texture.
Why did my crust turn out tough?
Overworking the dough or using warm butter are the most common culprits. Keep the butter cold and work it into the flour quickly with a pastry cutter or your fingers. Also, avoid chilling the dough for too long—30 minutes max. If the crust still seems tough, try adding 1 tablespoon cold milk or ice water to the dough to improve tenderness.