
Desserts
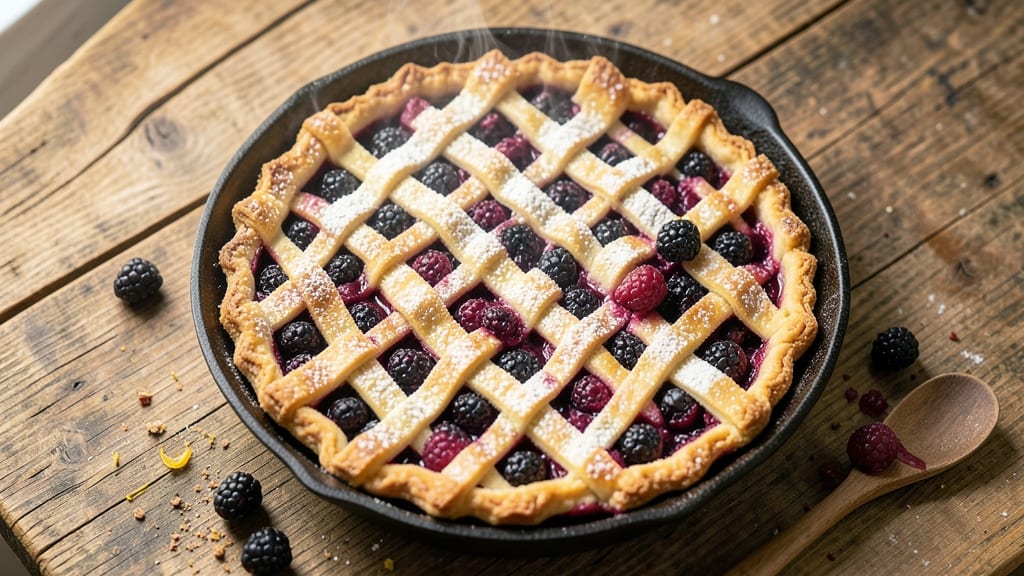
This Amish black raspberry pie delivers the perfect balance of tart berries and buttery crust that's been passed down through generations. The traditional Amish method uses a lattice crust for that signature rustic charm while keeping the filling juicy and flavorful.
I've simplified the process without sacrificing that authentic homestyle taste that makes this dessert so special—just a few key techniques make all the difference.
The secret to an exceptional pie lies in the crust, made with cold butter cut into flour until it resembles coarse crumbs. This creates flaky layers that melt in your mouth with every bite.
The filling combines fresh black raspberries with a touch of sugar and cornstarch to thicken it just enough while preserving that bright, tangy flavor. Baking at the right temperature ensures a golden crust and perfectly set filling that holds its shape when sliced.
What you'll end up with is a pie that looks as beautiful as it tastes—golden lattice crust with juicy berries peeking through, all surrounded by that characteristic flaky edge. The aroma alone will fill your kitchen with memories of summer berry picking and family gatherings.
This is the kind of dessert that becomes a centerpiece for any celebration or a comforting treat for quiet nights at home.
Serve it warm with a scoop of vanilla ice cream or whipped cream for the full Amish experience. The pie keeps well in the refrigerator for up to 4 days, making it perfect for meal prep or sharing with neighbors.
Here's how to create this classic dessert in your own kitchen.
Ingredients for amish black raspberry pie
Fresh berries, cold butter, and a few pantry staples create this iconic Amish dessert everyone will beg for seconds.
| Ingredient | Amount | Notes |
|---|---|---|
| Fresh Black Raspberries 🍇 | 6 cups | Picked at peak ripeness, stems removed |
| Granulated Sugar 🍚 | 1 ½ cups | Light brown sugar for depth |
| Cornstarch 🌾 | ¼ cup | For perfect filling thickness |
| Unsalted Butter 🧈 | 1 cup | Cold, cut into small cubes |
| All-Purpose Flour 🌾 | 2 ½ cups | Plus 2 tbsp for dusting |
| Ice Water 💧 | ½ cup | For dough elasticity |
| Salt 🧂 | ½ tsp | Fine sea salt preferred |
| Lemon Juice 🍋 | 1 tbsp | Freshly squeezed |
| Vanilla Extract 🌸 | 1 tsp | Pure vanilla for aroma |
| Large Egg 🥚 | 1 whole | For egg wash |
| Milk 🥛 | 1 tbsp | For egg wash richness |
| Granulated Sugar 🍚 | ¼ cup | For lattice sprinkle |
The berries are the heart of this pie, so prioritize freshness. Black raspberries are seasonal—look for deep purple-black color and plump, juicy berries at your local farmers market or Trader Joe's in summer. If you can't find them fresh, frozen black raspberries work too—just thaw and drain excess liquid. For the crust, cold butter is non-negotiable. Cut it into small cubes and keep it chilled until ready to use. The flour should be all-purpose, not self-rising, and measure it by spooning into the cup and leveling—don't pack it down. A food scale ensures perfect proportions if you're feeling fancy.
No black raspberries? Substitute blackberries or a mix of blueberries and raspberries—they'll still give that tart punch. Running short on cornstarch? Arrowroot powder works 1:1, but cornstarch gives a slightly firmer set. For the crust, if you don't have ice water, chilled vodka works in a pinch (the alcohol evaporates during baking). The vanilla extract can be imitation, but pure vanilla extract adds that authentic Amish touch. For the lattice, if cutting strips feels intimidating, use a pizza cutter—it creates clean, even slices every time. And trust me, the egg wash makes all the difference for that golden crust.
This pie tastes even better the next day, so bake it ahead if you can. Store it in an airtight container in the fridge for up to 4 days, though I've never had leftovers last that long. For the crust scraps, save them in the freezer—they're perfect for quick hand pies later. The filling keeps well too: transfer it to a jar and refrigerate for up to 3 days before baking. Just don't forget to add the crust when you're ready to bake! The lattice pattern? Use a toothpick to secure the strips so they don't shift during baking.
Why You'll Love This Recipe
- No Fuss Filling: I just toss those black raspberries with sugar and cornstarch—no fancy techniques, no overcomplicating. The butter in the crust melts into something golden while I'm still stirring the fruit, and honestly? That's all it takes.
- Tart-Sweet Magic: That first bite of warm crust with the jammy, slightly tangy raspberries? It’s like summer in a slice. The cornstarch thickens it just right—no runny mess, no gummy aftertaste—just pure, bold flavor that makes you reach for another.
- Pie for Any Moment: Weeknight dessert? Check. Picnic spread? Done. Even my kids beg for it after school (yes, really). The crust stays crisp, the filling holds up, and it’s the one thing I can make when I’m not feeling fancy but still want to impress.
- Budget-Friendly Luxury: Fresh black raspberries might sound fancy, but they’re cheaper than store-bought berry mixes—and way tastier. A single pie feeds six, and leftovers? They reheat beautifully with a scoop of vanilla ice cream. No waste, all flavor.
Step-by-step instructions for Amish black raspberry pie
Here's how to assemble this classic pie with a perfect balance of tart berries and buttery crust.
Prepare the Raspberry Filling
In a large bowl, combine the 6 cups fresh black raspberries, 1.5 cups granulated sugar, and 0.25 cup cornstarch. Gently stir until the sugar and cornstarch are evenly distributed throughout the berries. The cornstarch will help thicken the filling as it cooks, preventing a runny pie.
Transfer the mixture to a medium saucepan and cook over medium heat for 8-10 minutes, stirring frequently. You'll see the filling begin to bubble and thicken—this is when you'll know it's ready. The filling should coat the back of a spoon smoothly without being gluey. Once thickened, remove from heat and stir in 1 tablespoon lemon juice and 1 teaspoon vanilla extract. Let the filling cool completely before pouring into the pie crust. This cooling step is crucial to prevent a soggy bottom crust.
Make the Pie Crust Dough
In a large mixing bowl, combine the 2.5 cups all-purpose flour, 0.5 teaspoon salt, and 1 cup cold unsalted butter cut into small cubes. Using a pastry cutter or your fingers, work the butter into the flour until the mixture resembles coarse crumbs with some pea-sized butter pieces remaining. This texture is key for flaky layers.
Gradually add the 0.5 cup ice water, one tablespoon at a time, mixing gently with a fork until the dough just comes together. Be careful not to overmix—just until the dough holds when pressed. Turn the dough out onto a lightly floured surface and knead it 4-5 times until smooth. Divide the dough into two equal parts, flatten into discs, wrap in plastic, and refrigerate for at least 30 minutes. Chilling helps prevent shrinking during rolling.
Roll and Assemble the Crust
Preheat your oven to 375°F. On a lightly floured surface, roll out one dough disc into a 12-inch circle, about 1/8-inch thick. Transfer the rolled crust to a 9-inch pie dish, gently pressing it into the bottom and up the sides. Trim any excess dough hanging over the edge. Fill the crust with the cooled raspberry filling, mounding it slightly in the center.
Roll out the second dough disc and cut it into 1-inch wide strips for a lattice pattern. Arrange the strips in a crisscross pattern over the filling, leaving the center open to allow steam to escape. Brush the lattice with a mixture of 1 whole large egg and 1 tablespoon milk beaten together, then sprinkle the 0.25 cup granulated sugar evenly over the top. This creates a beautiful caramelized crust while keeping the lattice crisp.
Bake to Golden Perfection
Place the pie on a baking sheet lined with parchment paper to catch any drips, then bake in the preheated oven for 45-50 minutes. The pie is done when the crust is deep golden brown and the filling is bubbling gently at the edges. If the lattice starts to brown too quickly, tent the pie with aluminum foil to prevent burning.
Remove from the oven and let the pie cool completely on a wire rack for at least 2 hours before slicing. This resting time allows the filling to set properly and prevents a runny pie. Serve warm with a scoop of vanilla ice cream or whipped cream for the ultimate Amish-style dessert experience.
Pro Tips For Making Amish Black Raspberry Pie
- Prep Berries Fast: Toss black raspberries with 1-2 tablespoons sugar before cooking—they’ll release juices faster and thicken the filling more evenly. I learned this the hard way when my first batch turned into a runny mess because I waited too long.
- Chill the Dough: Roll out your pie crust cold—wrap it in plastic and refrigerate for at least 30 minutes. Warm dough shrinks, and you’ll end up with a sad, uneven edge. Trust me, your future pie crust will thank you.
- Skip the Overmixing: When making the cornstarch-sugar thickener, mix just until combined—no need to stir like you’re painting a fence. Overworking it turns the filling gummy, and that’s a texture no one wants in their pie.
- Vent the Top: Cut a few small slits in the pie’s top crust before baking—even if you’re not adding a lattice. Black raspberries steam like crazy, and vents prevent a soggy, puffed-up mess. (Yes, even if you’re not a perfectionist.)
Common mistakes when making your amish black raspberry pie
Overfilling the Crust
One of the most common mistakes is overfilling the pie crust—this leads to a messy, overflowing pie that's hard to slice cleanly. The filling should mound slightly in the center but not bulge over the edges.
I've seen pies with filling so high it spills out during baking, creating a sticky disaster. To avoid this, use a 9-inch pie dish and fill it with no more than 6 cups of berries (after cooking).
If your berries are extra juicy, reduce the filling by ½ cup to prevent spillage. 🍇
Skipping the Chill
Many home bakers rush and skip the crucial 30-minute chill for the pie dough. This leads to a tough, shrinking crust that doesn't hold its shape. The cold butter needs time to firm up, which creates those beautiful flaky layers.
I once forgot to chill my dough and ended up with a dense, sad crust that looked nothing like the flaky version in the recipe. Always refrigerate the dough before rolling—it makes all the difference. ❄️
Underestimating the Lattice
The lattice isn't just decorative—it's functional! A common mistake is cutting strips that are too wide (over 1.25 inches) or too narrow (under 0.75 inches), which makes the lattice look uneven or collapse during baking. I recommend using a ruler or pizza cutter for straight, even strips about 1 inch wide. Also,
Baking Without Parchment
Placing your pie directly on the oven rack or baking sheet without parchment paper can cause the bottom crust to burn while the filling stays undercooked. The lattice also tends to brown too quickly. I always line my baking sheet with parchment paper to create a barrier—this ensures even heat distribution and prevents the crust from scorching. If your lattice browns too fast, tent it with foil after 20 minutes to protect it while the filling cooks through. 🔥
Not Cooling Properly
Slicing the pie too soon is a recipe for disaster—it leads to a runny, messy filling and a soggy crust. The pie needs at least 2 hours to cool completely on a wire rack.
I've seen people cut into pies after just 30 minutes, only to have filling ooze out everywhere. The filling needs time to set properly, and the crust needs to firm up. Trust the process—waiting ensures clean slices and a perfect texture. ⏳
Using Warm Filling
Pouring hot filling into a cold crust can cause the butter to melt too quickly, leading to a soggy bottom. Always let your filling cool to room temperature before filling the crust.
I once rushed and poured warm filling into my pie, and by the time it came out of the oven, the bottom was greasy and the crust was limp.
If you're in a hurry, spread the cooled filling over the crust in an even layer—this helps prevent any hot spots that could weaken the crust. 🌡️
Nutrition facts
Frequently asked questions
Can I use frozen black raspberries instead of fresh?
Yes, but you'll need to thaw them first and drain any excess liquid. Frozen berries work well—they're often picked at peak ripeness and frozen immediately. Just be sure to pat them dry before measuring to avoid a watery filling. The texture will be slightly different but still delicious!
How do I make the crust extra flaky?
The secret is keeping everything cold and using cold butter cut into small cubes. Work quickly and avoid overmixing the dough—just until it holds together. Chill the dough for at least 30 minutes before rolling, and use a pastry cutter or your fingers to create those all-important butter pockets. Cold is key for that signature Amish flakiness!
What's the best way to store leftover pie?
Store your pie in an airtight container in the refrigerator for up to 4 days. For longer storage, freeze individual slices wrapped tightly in plastic wrap and foil. The filling actually improves after 1-2 days—the flavors meld beautifully. Just reheat slices in a 350°F oven for 10-15 minutes before serving.
Can I make this pie gluten-free?
Yes, but you'll need a gluten-free flour blend (like 1:1 baking flour) and add ½ teaspoon xanthan gum to help bind the crust. The filling remains the same. Keep in mind the texture will be slightly different—gluten-free crusts tend to be more crumbly. Test with a small batch first to adjust ratios.
Why is my lattice turning brown too quickly?
This usually happens when the oven is too hot or the lattice strips are too close together. Try tenting the pie with aluminum foil after 20 minutes of baking, or reduce your oven temperature by 25°F. The center should stay open to allow steam to escape—this helps prevent premature browning while keeping the filling juicy.