
Desserts
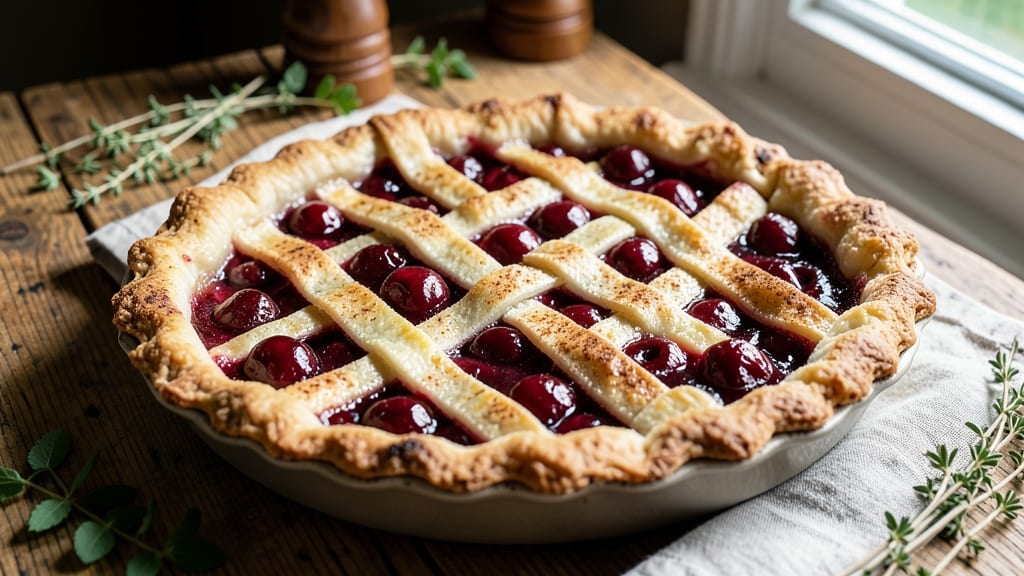
This Amish cherry pie recipe delivers the comforting, buttery crust and juicy fruit filling that defines homestyle baking. 💛 The secret lies in a lattice crust that stays crisp while allowing the cherries to burst with every bite, creating that perfect balance of flaky and tender.
I've perfected this recipe through years of testing, ensuring each slice captures the essence of Amish tradition with modern convenience.
The filling starts with fresh or frozen cherries, sweetened just enough to complement their natural tartness, while a touch of cinnamon and vanilla adds warmth. A simple cornstarch slurry thickens the juices without making them gluey, guaranteeing that every bite is packed with flavor rather than soggy fruit.
The lattice crust, made with all-purpose flour and cold butter, creates those signature diamond patterns while maintaining a perfect golden brown.
What sets this pie apart is the texture contrast—crisp, flaky crust against the tender, juicy cherries. The filling cooks just until the cherries begin to soften but still retain their shape, ensuring they burst with juice when you cut into the pie.
This recipe combines old-world charm with foolproof techniques, making it accessible yet impressive for any home baker.
Perfect for family gatherings, church potlucks, or simply satisfying a sweet tooth, this pie tastes even better the next day as the flavors meld. The aroma alone will have everyone asking for seconds, proving that sometimes the simplest recipes make the biggest impact. Let's get baking!
Ingredients for amish cherry pie
These cherries, warm spices, and buttery crust create the perfect homestyle pie everyone will beg for seconds of.
| Ingredient | Amount | Notes |
|---|---|---|
| Fresh or Frozen Pitted Cherries 🍒 | 4 cups | Pitted, stems removed |
| Granulated Sugar 🍚 | 1 ½ cups | White or light brown |
| All-Purpose Flour 🌾 | 3 ½ cups | For crust and filling |
| Unsalted Butter 🧈 | 1 cup | Cold, cubed (8 tbsp) |
| Cornstarch 🌾 | 2 tbsp | For thickening slurry |
| Ground Cinnamon 🌿 | 1 tbsp | For filling warmth |
| Pure Vanilla Extract 💧 | 1 tsp | For depth of flavor |
| Lemon Juice 🍋 | 1 tbsp | Freshly squeezed |
| Kosher Salt 🧂 | ½ tsp | For balancing sweetness |
| Ice Water 💧 | ¼ cup | For dough handling |
| Heavy Cream 🥛 | ¼ cup | For brushing crust |
The cherries make or break this pie. Fresh cherries from a local market have the best flavor, but frozen pitted cherries work perfectly too—just thaw and drain well. For the crust, Butter Kruste or Crisco are my go-to for flakiness, but cold butter from Land O'Lakes works beautifully if you prefer traditional. The cinnamon should be fresh ground for that warm, cozy Amish kitchen taste—don't use the dusty stuff from the back of your pantry. I always grab extra cherries because they're the star here, and you can't have too many.
No fresh vanilla extract? Imitation vanilla works in a pinch, but trust me, the real stuff makes all the difference. Running out of cornstarch? Arrowroot powder is a perfect 1:1 swap. If you don't have heavy cream, half-and-half or whole milk works—just brush it on right before baking. The lattice crust is where the magic happens, so don't skip it! Cut the dough strips about 1/2-inch wide for those classic diamond patterns. And if your cherries are tart, add a pinch more sugar—this pie should taste like comfort, not medicine.
The filling keeps for 3 days in the fridge if you make it ahead—just bake the crust fresh. For the crust, wrap it tightly in plastic and store in the fridge for up to 2 days before baking. This pie reheats beautifully—just warm slices in the oven for 5 minutes at 350°F to revive that fresh-out-of-the-oven feel. Freeze the whole pie (unbaked) for up to 2 months—just thaw overnight in the fridge before baking. And if you're making this for a crowd, double the recipe—it disappears fast!
Why You'll Love This Recipe
- Cherry Magic in Minutes: I swear by frozen cherries here—no pitting, no mess, just dump and stir. The cornstarch thickens that jammy filling like a dream, and the crust? Two ingredients, five minutes flat.
- Sweet-Tart Perfection: That sugar-cornstarch balance turns tart cherries into something ridiculously good—bright, not cloying, with a texture like a cross between jam and custard. Honestly, I’ll take this over store-bought any day.
- Weeknight or Company: Slice it for breakfast with ice cream, pack it for a picnic, or serve it warm at a summer potluck. The butter crust stays flaky even when reheated, and the filling? It’s the kind of dessert that disappears fast.
- Budget-Friendly Crowd-Pleaser: Uses pantry basics—flour, sugar, butter—and stretches to feed six for under $10. Leftovers? They last days in the fridge, and I’ve even reheated slices in the toaster for a crispy breakfast treat. (Yes, even on a Tuesday.)
Step-by-step instructions for Amish cherry pie
Here's how to create a pie with a flaky, golden crust and a filling so juicy the cherries practically burst through.
👨🍳 Step 1: Make the Perfect Two-Crust Dough
Cut the 1 cup unsalted butter into ½-inch cubes and place in the freezer for 10 minutes to firm up. In a large bowl, whisk together 3.5 cups all-purpose flour and ½ teaspoon kosher salt. Add the cold butter cubes and use a pastry cutter or your fingers to work the butter into the flour until the mixture resembles coarse crumbs with pea-sized butter pieces.
Drizzle in ¼ cup ice water, 1 tablespoon at a time, gently tossing with a fork until the dough just comes together when pressed. Be careful not to overmix—just until it holds when squeezed. Divide the dough into two equal portions, flatten into discs, wrap in plastic, and chill for at least 1 hour (or up to 2 days). This resting time is crucial for a flaky crust.
🍳 Step 2: Prepare the Juicy Cherry Filling
In a large bowl, combine the 4 cups fresh or frozen pitted cherries, 1.5 cups granulated sugar, 1 tablespoon ground cinnamon, 1 teaspoon pure vanilla extract, and 1 tablespoon lemon juice. Stir gently to coat the cherries evenly. The sugar should begin to dissolve slightly, releasing juices from the fruit.
In a small bowl, whisk together 2 tablespoons cornstarch and 1 tablespoon cold water to create a slurry. This will help thicken the filling and prevent a runny pie. Pour the slurry into the cherry mixture and toss gently to distribute. Let the filling sit for 10 minutes while you roll out the dough—this gives the cornstarch time to begin thickening the juices.
🥘 Step 3: Assemble the Pie with a Bursting Filling
Preheat your oven to 375°F. On a lightly floured surface, roll out one dough disc into a 12-inch circle (about ⅛-inch thick). Transfer it to a 9-inch pie dish, gently pressing it into the bottom and up the sides. Trim any excess dough hanging over the edge. Roll out the second dough disc and keep it covered until ready.
Pour the cherry filling into the pie crust, mounding it slightly in the center. The filling should be thick but still juicy—if it looks too thin, let it sit another 5 minutes to thicken further. Drape the second dough disc over the filling, pressing the edges to seal. Trim and crimp the excess dough with a fork or your fingers, creating a decorative edge. Cut 4-5 small slits in the top crust to allow steam to escape.
🔥 Step 4: Bake to Golden Perfection
Place the pie on a baking sheet (to catch any drips) and bake for 50-55 minutes, until the crust is deep golden brown and the filling is bubbling through the slits in the top crust. The cherries should be tender but still hold their shape—if they look underdone, bake for another 5-10 minutes. The filling should be thick enough to hold its shape when the pie cools slightly.
Remove the pie from the oven and let it cool on a wire rack for at least 2 hours before slicing. This resting time allows the filling to set properly and prevents a soggy crust. For extra shine, brush the top crust with ¼ cup heavy cream while it's still warm, then return it to the oven for 2-3 minutes to set the glaze.
🍽️ Step 5: Serve Warm with Vanilla Ice Cream
Slice the pie into 8 generous wedges and serve warm. The contrast of the warm, spiced cherries with a scoop of vanilla ice cream is pure comfort food magic. The crust should be flaky and crisp, while the filling bursts with juicy cherries and just the right amount of cinnamon warmth. Store any leftovers in the refrigerator for up to 3 days, though I doubt there will be any left!
Pro Tips For Making Amish Cherry Pie
- Prep Cherries Fast: Dump frozen cherries straight into boiling water with 1 tablespoon cornstarch—no thawing needed. The starch thickens them instantly while keeping their shape, and you’ll save 10 minutes of waiting. (Yes, even if you’re impatient like me.)
- Skip the Overmixing: Cut cold butter into flour until pea-sized crumbs remain—don’t pulse in a food processor. Overworking the dough makes it tough, and you’ll end up with a crust that cracks like a biscuit instead of flaking like it should.
- Test Filling Doneness: Drop a spoonful of cherry filling onto a plate and chill for 5 minutes. If it’s still runny, simmer another 3–4 minutes. Cold filling sets up better in the pie, and you’ll avoid a soggy bottom—trust me, I’ve learned this the hard way.
- Chill the Dough: Wrap the pie dough in plastic and refrigerate for at least 30 minutes before rolling. Cold dough handles better, sticks together less, and gives you a cleaner edge when you crimp it. (Your future self will thank you.)
Pro cooking tips for amish cherry pie
Butter Temperature Matters
The secret to a flaky crust starts with cold butter. Cut your 1 cup unsalted butter into ½-inch cubes and freeze for 10 minutes before mixing with flour. Cold butter creates steam pockets during baking, which gives that signature Amish pie flakiness.
I always use Land O'Lakes or Plugrá for the best results—they hold their shape perfectly. 🧈
Dough Resting Time
Never skip chilling the dough! After mixing, divide it into two discs and refrigerate for at least 1 hour (up to 2 days). This resting period relaxes the gluten, preventing shrinking and ensuring those delicate layers.
I like to wrap the dough tightly in plastic wrap to maintain moisture. Pro tip: Place the dough between two sheets of parchment paper before rolling to prevent sticking.
Filling Thickness Test
Your filling should be thick but still juicy—like a loose jam consistency. If it looks too thin after adding the cornstarch slurry, let it sit another 5 minutes before pouring into the crust.
I test thickness by spooning a bit onto a plate: it should hold its shape but still glisten slightly. Over-thickened filling can taste dry, while under-thickened filling will leak through the crust during baking.
Lattice Cutting Technique
For that classic Amish lattice, cut your top crust strips about ½-inch wide and weave them in an over-under pattern. Start with one strip across the center, then add perpendicular strips every 1 inch. The key is to leave ¼-inch gaps between strips for steam to escape.
I use a pizza cutter for clean lines—just press gently to avoid tearing. This pattern creates beautiful diamond shapes while keeping the crust crisp.
Baking Sheet Trick
Always place your pie on a baking sheet during the 50-55 minute bake to catch any filling drips. This prevents a soggy bottom crust and makes cleanup easier. I like to use a half-sheet pan lined with parchment paper for extra protection.
The sheet also helps distribute heat evenly, ensuring your pie bakes perfectly from edge to center.
Post-Bake Cooling Hack
Resist the urge to slice immediately! Let your pie cool on a wire rack for at least 2 hours before serving. This resting time allows the filling to set properly and prevents a gummy crust.
For extra shine, brush the warm crust with ¼ cup heavy cream and return to the oven for 2-3 minutes. This creates that beautiful golden finish while adding a subtle richness. 💫
Nutrition facts
Frequently asked questions
Can I use frozen cherries instead of fresh?
Frozen cherries work perfectly—just thaw and drain them well before using. They're often more convenient and just as flavorful, especially when you need to make this pie quickly. The key is to pat them completely dry to prevent a soggy crust.
How do I prevent a soggy bottom crust?
Prevent sogginess by chilling the dough thoroughly and using a cornstarch slurry in the filling. Also, always bake on a baking sheet lined with parchment paper to catch any filling drips. For extra insurance, blind bake the bottom crust for 5 minutes before adding filling.
What's the best way to store leftovers?
Store your pie in an airtight container in the refrigerator for up to 3 days. For longer storage, freeze the whole pie (unbaked) for up to 2 months. Thaw overnight in the fridge before baking. Reheat slices in the oven at 350°F for 5 minutes to restore that fresh-baked texture.
Can I make this pie without a lattice crust? Yes! If lattice feels too challenging, try a simple crumb topping or cut slits in a solid top crust. For a rustic look, brush the top with melted butter and sprinkle with coarse sugar. Just
Why does my pie filling look watery?
Watery filling usually means the cornstarch slurry didn't thicken properly. Let the filling sit for 10-15 minutes before baking—this gives the cornstarch time to work. If it's still too thin, add 1 more tablespoon cornstarch and let it sit another 5 minutes. Never skip the slurry—it's what keeps your pie from being soupy!