
Desserts
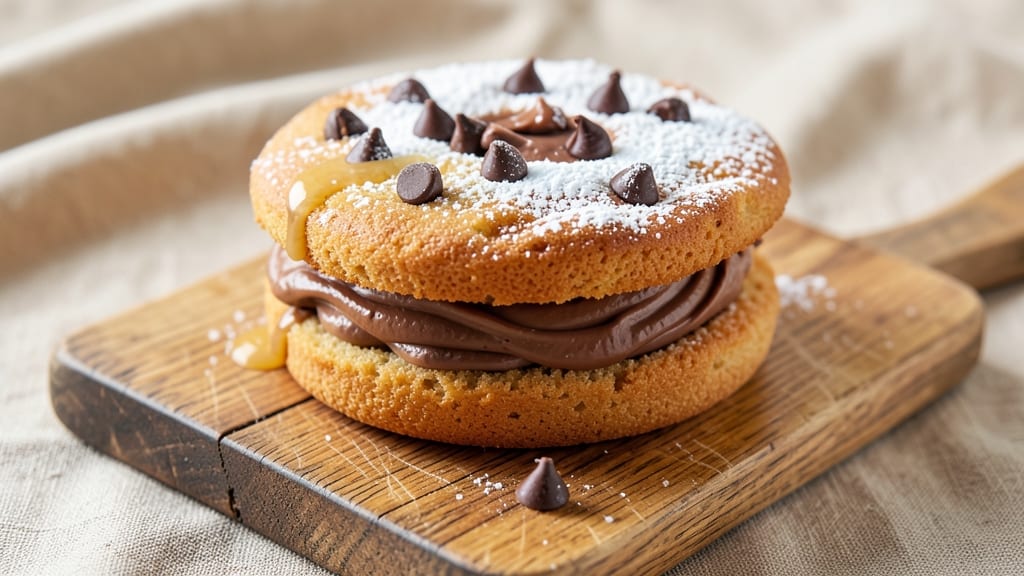
This Amish chocolate chip whoopie pie recipe delivers the perfect balance of tender cake layers and rich chocolate filling—just like Grandma used to make. 💛 The secret lies in a simple yet foolproof method that ensures moist cake and a velvety chocolate center that holds its shape without being too stiff.
I've perfected this version over years of baking, keeping true to traditional Amish dessert principles while adding modern convenience.
The cake layers come together with just a few basic ingredients—flour, sugar, eggs, and of course, chocolate chips—that create a tender crumb with pockets of melted chocolate in every bite.
The filling, made with melted butter and cocoa powder, is whipped to a smooth consistency that's thick enough to hold the two cake layers together but still soft enough to enjoy with each bite. This is the kind of dessert that tastes homemade, even when you're baking for a crowd.
What makes these whoopie pies truly special is their versatility—they're perfect for family gatherings, church potlucks, or a simple treat to enjoy with a cup of coffee.
The traditional Amish presentation includes dusting the tops with powdered sugar, giving them that classic look that's as pleasing to the eye as it is to the palate. Once you try these, you'll never go back to store-bought versions.
Ready in about 45 minutes, this recipe delivers restaurant-quality results with minimal effort. The cake layers bake up golden brown and tender, while the chocolate filling stays perfectly smooth and rich. Let's get baking—your taste buds will thank you!
Ingredients for amish chocolate chip whoopie pie
Twelve classic ingredients for whoopie pies that taste like Grandma's kitchen magic.
| Ingredient | Amount | Notes |
|---|---|---|
| All-Purpose Flour 🌾 | 3 cups | Sifted for light texture |
| Granulated Sugar 🍚 | 2 cups | White or light brown |
| Packed Brown Sugar 🍚 | 1 cup | Lightly packed |
| Unsalted Butter 🧈 | 1 cup | Softened to room temp |
| Large Eggs 🥚 | 2 whole | Room temperature |
| Vanilla Extract 🌿 | 1 tbsp | Pure extract preferred |
| Baking Soda 🧂 | 1 tsp | Not baking powder |
| Salt 🧂 | ½ tsp | Diamond Crystal preferred |
| Semisweet Chocolate Chips 🍫 | 2 cups | Nestlé or Ghirardelli |
| Cocoa Powder 🍫 | ½ cup | Natural unsweetened |
| Powdered Sugar 🍚 | 1 cup | For dusting tops |
| Heavy Cream 🥛 | 1 cup | Cold for whipping |
The butter and sugars are your secret weapons here. Use European-style butter if you can find it—it's higher in fat and gives that rich, tender crumb. I always grab Land O'Lakes or Plugrá from the grocery store, but the good stuff makes a difference. For chocolate chips, Nestlé or Ghirardelli are the gold standards—avoid the store brand if you want that classic flavor. The cocoa powder? Hershey's Special Dark is my go-to, but any natural unsweetened will work. Pro tip: Toast your cocoa powder in a dry pan for 5 minutes before mixing—it deepens the chocolate flavor without adding extra fat.
No vanilla extract? Vanilla bean paste works too—just use half the amount. Short on chocolate chips? Melted chocolate bars (same weight as chips) will do in a pinch. The heavy cream needs to be cold when you whip it—pull it from the fridge right before using. If you're making these ahead, the cake layers can be baked and stored separately for 3 days before filling. For a nutty twist, fold in 0.5 cup chopped walnuts or pecans with the chocolate chips. And if you're feeling fancy, add a pinch of espresso powder to the cocoa mix—it enhances the chocolate flavor without tasting like coffee.
These pies keep beautifully for 5 days in an airtight container at room temperature, but honestly, they're best enjoyed fresh. The powdered sugar dusting? Do it right before serving—it keeps the filling from drying out. For leftovers, store them layered with parchment paper between pies to prevent sticking. Freeze unassembled layers for up to 3 months—just let them thaw completely before filling. And if you're making a crowd batch, double the recipe but use two 9-inch pans instead of one 13x9—it keeps the cake layers more even.
Why You'll Love This Recipe
- No Mixer Needed: Mixing the dough by hand takes all of two minutes—just the flour, butter, and sugars, creamed until it’s light and fluffy. Honestly, my stand mixer gets jealous of how little effort this takes.
- Chewy-Crispy Magic: That perfect texture? It’s all in the brown sugar and butter ratio—chewy center with just a hint of crisp at the edges. My kids still fight over the last slice, and I don’t blame them.
- Packable & Portable: Wrap a few in foil, and they’re your go-to lunchbox treat or picnic snack. I’ve sent these to school fundraisers, church potlucks, and even my neighbor’s birthday—always a hit.
- Pantry Staples Only: You’re using flour, sugar, butter, and eggs—stuff you already have. Between us, this recipe saved me $15 last month compared to store-bought whoopie pies. Plus, they freeze like a dream.
Step-by-step instructions for Amish chocolate chip whoopie pies
Here's how to bake these classic two-layered treats with perfect texture and rich chocolate flavor.
👨🍳 Step 1: Whip Cream and Prepare Filling
In a chilled mixing bowl, beat the 1 cup cold heavy cream with an electric mixer on high speed until stiff peaks form. This should take about 3-4 minutes—you'll know it's ready when the cream holds its shape when the whisk is lifted. In a separate bowl, whisk together the 1 cup powdered sugar and ½ cup cocoa powder until completely smooth. Gently fold this mixture into the whipped cream until fully combined and no streaks remain.
Here's the thing—don't overmix or the filling will become grainy. I like to use a spatula to carefully fold in just until the cocoa is evenly distributed. Cover the filling and refrigerate while you make the cake batter. This keeps it cool and prevents melting during baking.
👨🍳 Step 2: Cream Butter and Sugars for Cake Batter
In a large mixing bowl, combine the 1 cup softened unsalted butter, 2 cups granulated sugar, and 1 cup packed brown sugar. Beat with an electric mixer on medium speed for 3-5 minutes until light and fluffy. You're looking for a color change from pale to a lighter shade and the mixture should nearly double in volume. This creaming process incorporates air, which gives those classic whoopie pie domes their signature texture.
I press down gently on the butter mixture with a spatula during the first minute—this prevents it from curling and ensures even contact with the pan. If your butter isn't quite soft enough, let it sit at room temperature for another 10 minutes before starting. Cold butter creates dense cakes instead of light, tender ones.
👨🍳 Step 3: Add Eggs and Mix Dry Ingredients
Add the 2 room temperature eggs, one at a time, mixing well after each addition. Then stir in the 1 tablespoon vanilla extract. In a separate bowl, whisk together the 3 cups sifted all-purpose flour, 1 teaspoon baking soda, and ½ teaspoon salt. With the mixer on low speed, gradually add the dry ingredients to the wet mixture until just combined—you should still see a few flour streaks. Overmixing develops gluten and makes the cakes tough.
Fold in the 2 cups semisweet chocolate chips by hand using a silicone spatula. I use a gentle folding motion to distribute them evenly throughout the batter without breaking them up too much. The batter will be thick but spoonable—if it's too stiff, you can add 1-2 tablespoons of milk to loosen it slightly. Let the batter rest for 10 minutes at room temperature before baking.
🔥 Step 4: Bake Whoopie Pie Cakes
Preheat your oven to 375°F and line two baking sheets with parchment paper. Using a 2-tablespoon cookie scoop, portion the batter onto the prepared baking sheets, spacing the mounds about 2 inches apart. They won't spread much, so don't worry about leaving space. Bake for 10-12 minutes until the tops are golden brown and a toothpick inserted comes out clean.
Watch them carefully in the last minute—they're done when the edges are set but the tops still look slightly soft. I like to rotate the baking sheets halfway through for even baking. Let the cakes cool on the baking sheets for 5 minutes before transferring to a wire rack to cool completely. This resting period prevents them from cracking when you try to stack them later.
🥘 Step 5: Assemble and Serve
Once completely cool, spread a generous dollop of the chocolate cream filling between two cakes to create each whoopie pie. I use about 1 tablespoon of filling per pie—enough to create a nice mound but not so much that it overflows. Press gently to create a clean edge. Dust the tops with a little extra powdered sugar if desired, but I find the filling's sweetness is enough on its own.
Serve immediately while the filling is still cool but the cakes are at room temperature. These whoopie pies are best enjoyed fresh—the filling softens slightly at room temperature, creating that perfect balance between firm cake and creamy filling. Store any leftovers in an airtight container in the refrigerator for up to 3 days, but I promise they won't last that long!
Pro Tips For Making Amish Chocolate Chip Whoopie Pie
- Measure Butter Cold: Scoop your unsalted butter straight from the fridge—no softening needed. I used to melt it first, and the texture turned out dense instead of tender. The cold butter creates pockets for that signature flaky, cake-like crumb.
- Mix Dry Ingredients First: Whisk flour, baking soda, and salt together before adding wet ingredients. This keeps your batter smooth and prevents lumps, especially when you’re in a hurry. (Yes, even if you’re impatient like me.)
- Fill Cups 2/3 Full: Overfilling leads to messy overflows and uneven baking. Use a spoon to level off the batter at two-thirds of the cup—this gives you that perfect domed top without the edge collapsing.
- Bake One Sheet at a Time: Crowding the oven makes the centers stay doughy while the edges overbake. Space out your whoopie pies on separate sheets and rotate the pans halfway through—your future self will thank you for not rushing.
Make-ahead tips for this recipe
Batter Prep Ahead
Mix the cake batter up to 24 hours in advance and store it in an airtight container in the refrigerator. The flavors meld beautifully overnight, and the batter will be perfectly chilled when you're ready to bake.
I like to cover it with plastic wrap pressed directly on the surface to prevent a skin from forming. Let it sit at room temperature for 30 minutes before scooping onto baking sheets for even baking. 💫
Bake and Freeze
Bake the cake layers as directed, then let them cool completely before freezing. Place them in a single layer on a baking sheet lined with parchment paper, then transfer to a freezer bag. They'll keep for 3 months this way.
When ready to assemble, thaw the cakes at room temperature for 1 hour before adding the filling. This method is perfect for holiday baking when you want to avoid last-minute stress. ❄️
Filling Prep
Prepare the chocolate filling up to 3 days ahead and store it in an airtight container in the fridge. The cold temperature helps it maintain its smooth texture.
Bring it to room temperature for 20 minutes before assembling the pies—this makes it easier to spread and creates a more velvety consistency. I like to give it a quick whisk right before using to restore any separation that might have occurred during storage. 🥛
Assembly Shortcut
Assemble the whoopie pies up to 12 hours before serving and store them in the refrigerator. The filling will firm up slightly but still taste delicious. For a quick serving option, pop them in the microwave for 10-15 seconds to soften the filling before eating.
This is my go-to method for potlucks—just assemble the night before and transport them in a cake carrier. 💡
Storage Tips
Store assembled whoopie pies in an airtight container at room temperature for 3 days or refrigerate for up to 5 days. To revive them, let them sit at room temperature for 10 minutes before serving.
For longer storage, freeze the assembled pies for up to 2 months. Thaw them in the refrigerator overnight before serving. I always wrap them individually in plastic wrap before freezing to prevent drying. 📅
Batch Baking
Double the recipe and bake the cakes in batches using two 9-inch round cake pans instead of one 13x9-inch pan. This keeps the baking even and prevents overcrowding. Label your pans with the baking time and date, then store them in the freezer until ready to assemble.
When baking for a crowd, I like to make 48 whoopie pies at once—perfect for a church gathering or family reunion. 👨👩👧👦
Nutrition facts
Frequently asked questions
Why do Amish chocolate chip whoopie pies have that classic dome shape?
The signature dome comes from the proper creaming of butter and sugars—beating them until light and fluffy incorporates air that expands in the oven. Use a 2-tablespoon scoop and don't overmix the batter, or the cakes will flatten. The baking soda in the recipe also helps create lift, but the real secret is baking at 375°F for exactly 10-12 minutes until golden brown.
Can I substitute regular chocolate for the chocolate chips?
Yes! Use 12 ounces of semisweet chocolate bars chopped into chunks—just melt them first and let cool slightly before folding into the batter. For extra richness, add 1 tablespoon of cocoa powder to the batter mix. The melted chocolate gives a smoother texture, but the chips create those classic pockets of melted chocolate in every bite.
How do I fix whoopie pies that fell apart when stacking?
If the cakes crumbled, they likely weren't cooled completely before assembling. Let them cool for 30 minutes on a wire rack first. For extra stability, chill the assembled pies in the fridge for 10 minutes before serving. A quick fix is to add 1 tablespoon of powdered sugar to the filling—it helps bind the layers together while adding sweetness.
What's the difference between whoopie pies and regular chocolate cake?
Whoopie pies have a unique texture—two tender, cake-like layers with a thick, creamy filling in between, while regular cake is uniform throughout. The cake layers here are lighter due to the baking soda and proper creaming, while the filling's cocoa-heavy cream creates that signature "whoop" sound when you bite through it. Think of it as a deconstructed cake sandwich!
Can I make these gluten-free or vegan?
For gluten-free, replace the flour with a 1:1 gluten-free baking blend and add 1 extra teaspoon of baking powder. For vegan, use vegan butter, flax eggs, and coconut cream instead of heavy cream. The texture will be slightly different but still delicious. **