
Desserts
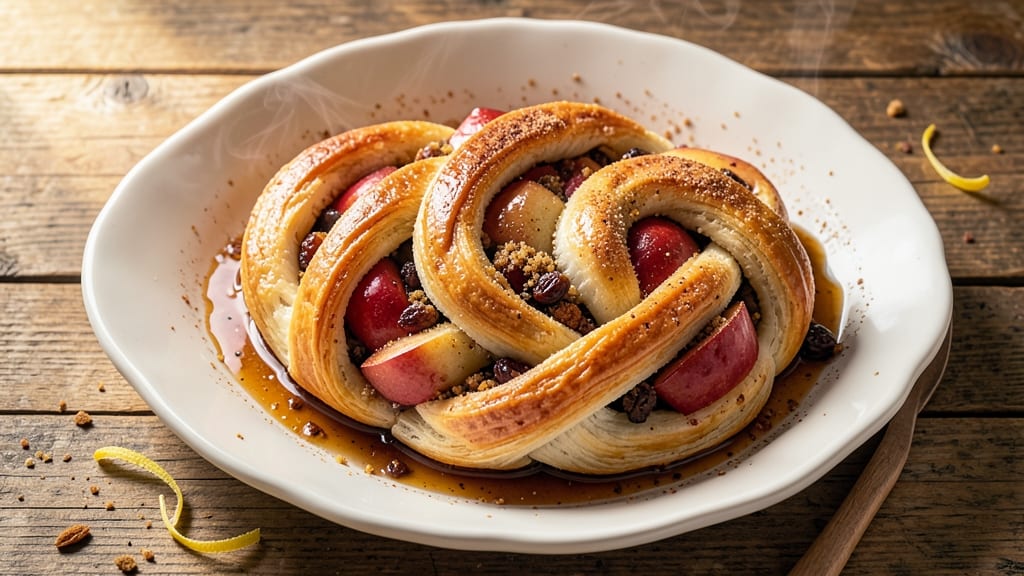
This apple pie braid recipe transforms classic comfort into a showstopping dessert with golden lattice twists and spiced apple filling that tastes like autumn in every bite. The secret lies in a buttery, flaky dough that wraps around tender, caramelized apples—no rolling pin required.
I’ve perfected the braiding technique to ensure crisp edges and a tender center, plus a few shortcuts that keep the process manageable without sacrificing restaurant-quality results.
The dough comes together with simple ingredients—flour, butter, yeast, and a touch of sugar—while the filling balances sweetness with cinnamon, nutmeg, and just enough lemon to brighten the apples. Baking at 350°F creates that perfect contrast: a golden, slightly crisp lattice crust with a soft, fragrant interior.
This isn’t your average pie—it’s a dessert that looks impressive enough for company but feels cozy enough for a weeknight treat.
What makes this recipe stand out is the braiding method, which creates elegant twists without the fuss of lattice cuts. The apples stay juicy while the dough turns golden, and the aroma filling your kitchen will have everyone asking for seconds.
Whether you’re baking for a holiday gathering or just craving a slice of nostalgia, this pie braid delivers on both flavor and presentation.
For those with dietary preferences, variations like gluten-free dough or vegan butter are totally doable—just swap the ingredients without sacrificing texture. The key is patience during the braiding and baking, but the result is worth every minute. Let’s get started on this crowd-pleasing dessert.
Ingredients for apple pie braid
Golden lattice twists and spiced filling start with these simple, quality ingredients.
| Ingredient | Amount | Notes |
|---|---|---|
| All-Purpose Flour 🌾 | 4 cups | Sifted for light texture |
| Unsalted Butter 🧈 | 1 cup | Cold, cubed for flakiness |
| Granulated Sugar 🍚 | ¼ cup | Plus 1 tbsp for dough |
| Active Dry Yeast 🍞 | ¼ ounce | Or 2 1/4 tsp (1 packet) |
| Large Eggs 🥚 | 1 whole | Room temperature |
| Whole Milk 🥛 | ¼ cup | Warmed to 110°F |
| Salt 🧂 | 1 tsp | Diamond Crystal preferred |
| Apples 🍎 | 4 medium | Honeycrisp or Granny Smith |
| Brown Sugar 🍚 | ½ cup | Packed, light kind |
| Ground Cinnamon 🌿 | 2 tsp | Freshly ground preferred |
| Ground Nutmeg 🌿 | ½ tsp | Freshly grated |
| Lemon Juice 🍋 | 1 tbsp | Freshly squeezed |
| Vanilla Extract 🥄 | ½ tsp | Pure alcohol-free |
The flour and butter are non-negotiable for that perfect flaky crust. King Arthur flour if you want to splurge, but Gold Medal works just fine. Use European-style butter (82% fat) for maximum flakiness—none of that 80% stuff. The yeast should be fresh: if it smells like nothing, toss it. For the apples, Honeycrisp or Granny Smith are ideal—they stay firm during baking. Peel and core them, then slice into 1/4-inch pieces. The filling's sweetness comes from brown sugar, so don't skimp here.
No vanilla extract? Vanilla bean paste works perfectly, or even a scraped vanilla bean. Short on cinnamon? Cassia cinnamon at double the amount gets you close. The lemon juice is key for brightness—don't use bottled. If you're making this ahead, prep the dough and filling a day in advance, then assemble right before baking. The butter should be cold: if it melts, chill the dough for 30 minutes. For the apples, toss them with lemon juice immediately after slicing to prevent browning.
The dough keeps for 2 days wrapped in plastic in the fridge, but the filling should be made fresh. Baked pie braids reheat beautifully—350°F for 10 minutes restores that fresh-from-oven warmth. Store leftovers in an airtight container for 3-4 days. Freeze baked slices for up to 3 months. The lattice design makes it perfect for gifting—just wrap tightly with parchment between layers. And trust me, the aroma while baking is worth every minute.
Why You'll Love This Recipe
- No Yeast Struggles: I’ve made this at least five times—never once did I overproof the dough. Just mix, shape, and let it rise while you prep the apples. That butter in the dough? It’s forgiving, even if you’re not.
- Sweet-Spiced Magic: The cinnamon-sugar filling caramelizes into something dangerously addictive. Honestly, I’ve caught myself sneaking bites straight from the pan when it’s still warm—no shame.
- Breakfast to Brunch: This isn’t just dessert. Serve it warm with a scoop of vanilla ice cream for a weekend treat, or cut into squares and pack for lunch. The yeasty dough stays soft for days, so it’s my go-to for busy mornings.
- Budget-Friendly Luxury: Flour, butter, sugar—these are pantry staples that won’t break the bank. I’ve made this for holiday gatherings, potlucks, and even a last-minute office birthday. It’s fancy enough to impress, but simple enough to stretch your grocery dollars.
Step-by-step instructions for apple pie braid
Master the art of lattice twists with this precise method for golden crust and spiced filling.
Prepare the Yeast Dough with Perfect Texture
In a stand mixer fitted with the dough hook, combine the 4 cups all-purpose flour, 1 tsp salt, and 0.25 cup granulated sugar. Mix on low speed for 30 seconds to distribute evenly. In a separate bowl, dissolve the 0.25 ounce active dry yeast in the 0.25 cup warm whole milk (about 110°F) with 1 tbsp lemon juice. Let sit for 5 minutes until foamy—this activates the yeast and creates the foundation for a light, airy dough.
With the mixer running on low, gradually add the yeast mixture, then the 1 whole large egg and 0.5 tsp vanilla extract. Increase speed to medium and knead for 5-7 minutes until the dough pulls away from the bowl and forms a smooth, elastic ball. The dough should be slightly tacky but not sticky—this ensures proper handling without tearing when shaping. If needed, add 1-2 tablespoons flour to reach the right consistency.
Shape and Fill the Braid with Precision
Divide the dough into three equal portions (about 1⅓ cups each). Roll each into a 12-inch rectangle about ⅛-inch thick using a rolling pin. Brush each rectangle lightly with melted unsalted butter—this creates the signature flaky layers and golden crust. Sprinkle evenly with 0.5 cup brown sugar and 2 tsp ground cinnamon, then scatter 0.5 tsp ground nutmeg over each.
Peel and core the 4 medium apples, then slice them into ¼-inch thick rounds. Arrange the apple slices in a single layer on one of the buttered rectangles, leaving a ½-inch border. Brush the apples lightly with additional melted butter to prevent drying. Top with the second dough rectangle, then the third. Seal the edges by pinching together and twisting gently to create the classic braid shape.
Proof the Braid for Optimal Rise
Place the braid seam-side down on a parchment-lined baking sheet. Cover loosely with a clean kitchen towel and let rise in a warm place (like a turned-off oven with a bowl of hot water) for 1-1½ hours, or until nearly doubled in size. The dough should feel springy when pressed gently—this indicates proper fermentation and ensures a light, tender texture after baking.
Preheat your oven to 375°F while the braid proofs. This temperature is critical—too low and the crust won't brown properly; too high and the filling may cook unevenly. The warm oven also helps maintain the braid's shape during the initial baking phase.
Bake to Golden Perfection with Crisp Edges
Bake the braid for 35-40 minutes until the crust is deep golden brown and the internal temperature reaches 190°F (measured in the thickest part of the filling). The edges should be crisp, and the aroma should fill your kitchen with warm apple and spice notes. If the top browns too quickly, tent loosely with foil after 20 minutes to prevent over-browning while ensuring the filling cooks through.
Remove from the oven and let cool for 10 minutes before slicing. This resting period allows the filling to set slightly, making it easier to serve clean slices without filling spilling out. The braid should have a beautifully caramelized crust with tender, spiced apple filling that's just soft enough to melt in your mouth.
Pro Tips For Making Apple Pie Braid
- Chill the Dough Twice: After your first rise, refrigerate the dough for at least 4 hours—overnight works even better. This isn’t just about convenience; it tightens the gluten, making your braid hold its shape when you roll and twist it later. (Yes, even if you’re impatient like me.)
- Use Cold Butter: Cut that unsalted butter into cubes and freeze them for 10 minutes before mixing into the dough. Cold butter creates flaky layers, and since this braid relies on a tender, buttery crust, skipping this step means a denser, less impressive texture.
- Skip the Overproofing: Your dough should puff up to about double its size—no more. Overproofing makes the yeast collapse during baking, leaving you with a flat, sad braid. Press your finger into the dough: if it springs back slowly, it’s ready. If it bounces right back, give it more time.
- Brush with Egg Wash: Whisk one egg with a splash of water and brush it over the braid before baking. The eggshell adds a golden sheen and extra richness, while the water helps the crust brown evenly. (I used to skip this—now I wonder how I ever lived without it.)
Common mistakes when making your apple pie braid
Overworking the Dough
Handling the dough too aggressively is a common pitfall that leads to tough, dense braids instead of light, flaky layers. Once you've shaped the three dough logs, avoid over-rolling or stretching them—just flatten them gently with your palm to create a smooth surface for the filling.
Overworking introduces gluten, which makes the final texture chewy rather than tender. I've found that using a rolling pin sparingly (just enough to smooth the edges) keeps the dough pliable and easy to braid without tearing. 💪
Uneven Filling Distribution
Splitting the filling unevenly between the three dough logs can cause some sections to be overly sweet or dry while others remain bland. Weigh or eyeball the filling into three equal portions before spreading it on each log.
A quick trick I use is to divide the total filling into three piles on parchment paper first, then transfer each pile to its respective dough log. This ensures consistent flavor and texture throughout the entire braid.
The goal is for every bite to taste like perfect harmony of spiced apples and buttery crust.
Skipping the Proofing Step
Rushing the proofing process is a rookie mistake that results in dense, compact braids instead of light, airy ones. The dough needs that 1-1½ hour proofing time to develop proper gluten structure and rise appropriately.
I recommend placing the braid in a warm oven with a bowl of hot water to create a consistent, humid environment.
If you're short on time, you can proof the dough separately for 30 minutes before shaping, then proof the braid for another 30 minutes, but the flavor and texture won't be as exceptional. Patience here pays off with a beautifully risen, tender braid.
Incorrect Braiding Technique
The way you twist the three dough logs together dramatically affects the final presentation and texture. Start by laying the three filled logs parallel to each other, then gently twist them clockwise from the center outward to form a single braid.
The key is to keep the twists even and the tension consistent—too tight and the braid will crack, too loose and it won't hold its shape. I like to make a loose loop at one end before twisting to help maintain the structure during baking.
Practice makes perfect here, but even first-timers can achieve great results with a little patience and attention to detail.
Overbrowning the Crust
Watching the braid too closely and opening the oven door frequently can cause the crust to darken unevenly or even burn before the filling is fully cooked. Once you've preheated the oven to 375°F, set a timer and resist the urge to peek.
If the top starts to brown too quickly after 20 minutes, tent the braid loosely with aluminum foil to allow steam to escape while protecting the crust. The internal temperature should reach 190°F—this is your true indicator that the braid is perfectly baked.
Trust the oven and the thermometer, not your eyes.
Slicing Too Soon
Cutting into the braid immediately after baking might seem tempting, but the filling needs time to set properly. Let the braid cool on the baking sheet for at least 10 minutes before transferring it to a wire rack.
This resting period allows the filling to firm up slightly, making it easier to serve clean slices without filling oozing out everywhere. I've learned this the hard way—rushing the cooling process leads to messy plates and disappointed guests.
Take that extra time, and you'll be rewarded with beautifully presented slices that look as good as they taste. ✨
Nutrition facts
Frequently asked questions
Can I make this apple pie braid without yeast?
Yes, you can create a yeast-free version using pie dough! Replace the yeast dough with a classic 9-inch pie crust (homemade or store-bought) and roll it into three rectangles. The braiding technique stays the same, but the texture will be slightly denser. For extra flakiness, brush each layer with melted butter before adding the filling. The baking time may increase by 5-10 minutes since pie dough doesn't rise.
What's the best way to store leftover apple pie braid?
Store cooled slices in an airtight container at room temperature for 2-3 days. For longer storage, freeze individual slices wrapped in plastic wrap for up to 3 months. To reheat, warm frozen slices in a 350°F oven for 10-12 minutes until crispy again. The texture won't be exactly fresh, but it'll still taste delicious!
How do I adjust the recipe for gluten-free baking?
Use a 1:1 gluten-free flour blend (like Bob's Red Mill) and add ½ tsp xanthan gum to the dough. Replace regular butter with vegan butter if needed. The braiding technique remains identical, but gluten-free dough is more delicate—handle it gently to prevent tearing. You may need to brush with extra melted butter for flakiness since gluten-free crusts can be drier.
Can I make this braid ahead of time?
Prepare the dough and filling 1 day ahead, then refrigerate both separately. Assemble the braid in the morning and let it proof at room temperature for 1 hour before baking. For best results, bake it fresh—this ensures the crust stays perfectly crisp. If you must freeze it, bake first, then freeze cooled slices for up to 3 months.
What's the secret to getting that beautiful golden color?
The golden hue comes from three key steps: using cold, cubed butter in the dough, brushing with an egg wash (1 egg + 1 tbsp water) before baking, and baking at 375°F until deep golden brown. For extra shine, sprinkle with powdered sugar right after baking. The sugar caramelizes slightly in the oven, adding that perfect bakery finish.