
Desserts
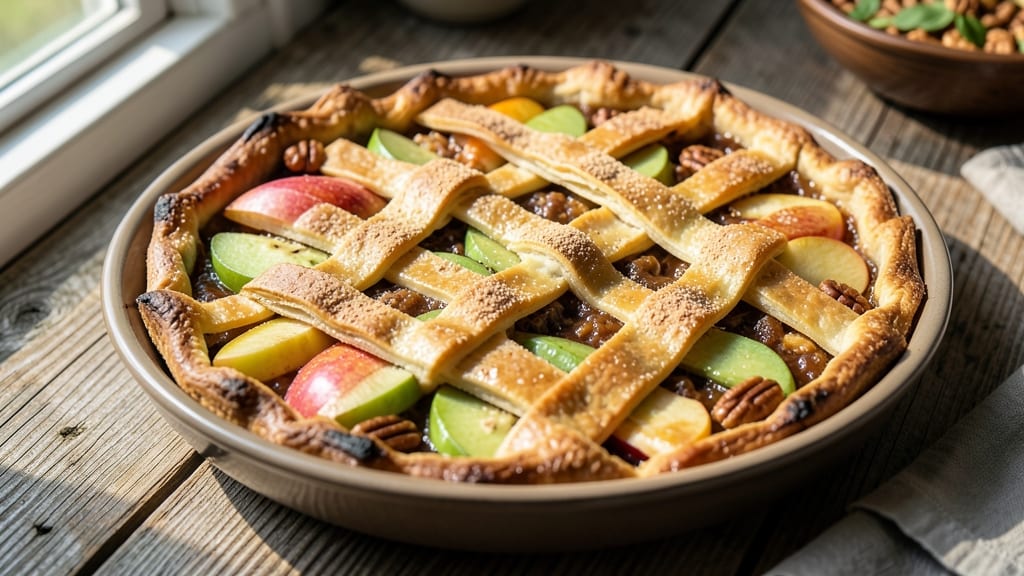
This scrumptious apple pie recipe delivers the perfect balance of flaky cinnamon-kissed crust and tender, spiced apple filling that bakes to golden perfection. 🌟 The secret lies in a well-chilled pie dough that creates layers so delicate they practically melt in your mouth, while the filling combines tart and sweet apples with warm spices that transform your kitchen into a cozy autumn haven.
What sets this recipe apart is the foolproof technique for achieving a crisp yet tender crust without shortcuts—just a few simple ingredients and patience.
The apple filling gets its signature texture from a mix of Granny Smith and Honeycrisp apples, sliced uniformly for even cooking, while a blend of cinnamon, nutmeg, and a touch of lemon juice keeps the flavors vibrant and balanced.
By the time it emerges from the oven, you'll have a pie with a caramelized top, a lattice crust that adds rustic charm, and filling so tender it practically dissolves.
The aroma alone will have everyone gathering around the table, and each slice delivers that perfect harmony of crisp crust, spiced apples, and buttery richness.
Serve it warm with a scoop of vanilla ice cream or a drizzle of caramel for the ultimate dessert experience. This is the kind of pie that becomes a family tradition—let's get baking!
Ingredients for scrumptious apple pie
Eight simple ingredients create the magic of this flaky cinnamon-kissed pie crust and spiced filling.
| Ingredient | Amount | Notes |
|---|---|---|
| Granny Smith Apples 🍎 | 4 medium | Peeled, cored, sliced thin |
| Honeycrisp Apples 🍎 | 4 medium | Peeled, cored, sliced thin |
| All-Purpose Flour 🌾 | 3 cups | Plus 2 tbsp for dusting |
| Unsalted Butter 🧈 | 1 cup | Cold, cubed for crust |
| Granulated Sugar 🍚 | 1 ¼ cups | For filling and crust |
| Light Brown Sugar 🍚 | ½ cup | Packed, for filling |
| Ground Cinnamon 🌿 | 2 tbsp | Plus 1 tsp for crust |
| Ground Nutmeg 🌿 | ½ tsp | Freshly grated preferred |
| Lemon Juice 🍋 | 2 tbsp | Freshly squeezed |
| Salt 🧂 | 1 ½ tsp | Fine sea salt preferred |
| Ice Water 💧 | ½ cup | For dough elasticity |
| Vanilla Ice Cream 🍦 | 1 ½ cups | For serving (optional) |
The apples are everything—Granny Smith for tartness, Honeycrisp for sweetness. Grab them at Trader Joe's or any grocery store—they keep for weeks in the fridge. Slice them uniformly (about 1/4-inch thick) so they cook evenly. Don't skip peeling—it keeps the filling from turning mushy. If you're feeling fancy, toss the slices in a little lemon juice before baking to keep them bright. The crust? Cold butter is non-negotiable—cut it into tiny cubes and keep it chilled until the last minute.
No Granny Smith? Fuji or Pink Lady work in a pinch, but you'll lose that signature tartness. Short on Honeycrisp? Gala or Braeburn add sweetness, though they'll be less juicy. The cinnamon in the crust is key—Penzeys or McCormick are my go-tos, but any ground cinnamon will do. For the filling, brown sugar adds moisture, so don't swap it for white. Lemon juice? Bottled works, but fresh is better. And if you're out of ice water? Freeze a cup of water overnight—it melts just enough to help the dough come together.
The dough needs at least 2 hours chilling—set a timer so you don't forget. Store leftovers in an airtight container for 3-4 days, though honestly, it rarely lasts that long. The filling can be prepped ahead and refrigerated for 1 day before baking. For a crowd, double the recipe—this pie freezes beautifully (just thaw overnight before serving). And that ice cream? Vanilla bean is overkill, but any flavor works—just keep it cold until the last minute.
Why You'll Love This Recipe
- No-Fuss Assembly: I swear by this crust—just butter, flour, and a pinch of salt. Roll it out, fold the edges, and you’re done. No fancy lattice, no stress.
- Tart-Sweet Magic: Granny Smiths bring that bright tang, while Honeycrisp adds juicy sweetness. The sugar caramelizes just enough to make every bite taste like autumn in a pan.
- Weeknight or Holiday: Same pie, endless uses. Serve warm with vanilla ice cream for company or pack slices for school lunches. Even my picky teens ask for seconds.
- Budget-Friendly Staples: Butter and flour stretch far, and apples stay cheap. One pie feeds six, and leftovers reheat beautifully—no waste, just pure comfort.
Step-by-step instructions for cinnamon-kissed apple pie
Here's how to build a pie so perfect, it'll make your kitchen smell like autumn magic.
👨🍳 Step 1: Make the Spiced Filling That'll Have Everyone Begging for Seconds
In a large bowl, combine the 4 medium Granny Smith Apples and 4 medium Honeycrisp Apples, both peeled, cored, and sliced thin. Toss them with 1.25 cups Granulated Sugar, 0.5 cup Light Brown Sugar, 2 tbsp Ground Cinnamon, 0.5 tsp Ground Nutmeg, and 2 tbsp Lemon Juice. This tangy-sweet mix is what makes the filling irresistible.
Let the apple mixture sit for 15 minutes while you work on the crust. This gives the lemon juice time to tenderize the apples slightly and release their juices. You'll want the filling to be juicy but not soupy—this balance is key for that perfect texture when baked.
🍳 Step 2: Craft the Perfect Crust That'll Be Flaky Enough to Make You Swoon
In a food processor, pulse together the 3 cups All-Purpose Flour, 1.5 tsp Salt, and 1 tsp Ground Cinnamon (the extra for the crust). Add the 1 cup Unsalted Butter, cut into cubes, and pulse until the mixture resembles coarse crumbs with pea-sized butter pieces. Here's the thing—don't over-process or the crust will turn tough.
Drizzle in the 0.5 cup Ice Water, one tablespoon at a time, until the dough just comes together when pressed. It should hold when squeezed but not be sticky. Divide the dough into two equal discs, wrap each in plastic, and chill for at least 1 hour. Chilling relaxes the gluten and prevents shrinking during baking.
🥘 Step 3: Assemble the Pie Like a Pro (This Is Where the Magic Happens)
Preheat your oven to 375°F. Roll out one disc of chilled dough on a floured surface to fit a 9-inch pie dish, leaving a 1-inch overhang. Gently press it into the dish, then trim the edges to ½-inch. Here's a pro tip: Use a fork to crimp the edges with the overhang—this creates that beautiful lattice look without extra work.
Pour in the prepared apple filling, mounding it slightly in the center. Roll out the second dough disc and cut it into ½-inch wide strips. Weave these strips over the filling in a lattice pattern, leaving the center open for steam to escape. Brush the top with a little beaten egg white for that golden shine.
🔥 Step 4: Bake to Golden Perfection (Patience Pays Off Here)
Place the pie on a baking sheet (to catch any drips) and bake for 50-60 minutes until the crust is deep golden brown and the filling bubbles around the edges. The center should still have a slight jiggle—it'll firm up as it cools. If the edges brown too quickly, cover them with foil.
For the final touch, increase the oven temperature to 400°F and bake for 5-10 minutes more until the crust is beautifully caramelized. Let the pie cool for at least 2 hours before slicing—this resting time lets the juices set and makes for cleaner slices. Serve warm with 1.5 cups Vanilla Ice Cream for the ultimate indulgence!
Pro Tips For Making Scrumptious Apple Pie
- CHOP APPLES UNIFORMLY: I learned this the hard way—big chunks turn to mush, tiny bits turn to apple sauce. Aim for ¼-inch slices, then cut each slice into 3-4 wedges. This keeps texture perfect: tender but still holding shape after baking.
- USE COLD BUTTER: Skip the softened butter for the crust—cold cubes mixed into flour create flaky layers. Cut the butter into the flour quickly with a pastry cutter or your fingers (yes, even if you're impatient like me), and keep everything chilled until rolling. The effort guarantees that crisp, buttery crust you crave.
- STEAM THE CRUST: Before adding filling, prick the bottom crust all over with a fork, then bake it blind for 8-10 minutes at 375°F (375°F is non-negotiable here). The steam from the hot water in the pie dish prevents soggy bottoms—no one wants a gummy mess where the crust should be.
- SWAP HALF THE SUGAR: Granny Smiths and Honeycrisp are tart enough that you don’t need a ton of sugar. Replace ¼ cup of the granulated sugar with honey or maple syrup in the filling. It caramelizes differently, adding depth without overpowering the apples’ natural brightness. Trust me, it’s subtle but makes a real difference.
Essential equipment for scrumptious apple pie
Pie Dish Essentials
A 9-inch glass or ceramic pie dish is my go-to—it distributes heat evenly and prevents soggy bottoms. I recommend Pyrex for its durability and even baking. If you're baking two pies at once, use two 9-inch dishes instead of one large 10-inch—they'll bake more evenly.
Avoid dark metal pans, which can over-brow the crust too quickly. 🌟
Rolling Pin & Dough Tools
For rolling out dough, a wooden rolling pin (like OXO Good Grips) is gentler on your joints and gives better control. Keep it chilled in the freezer for 5 minutes before use—this prevents the dough from sticking.
A pie crust shield (or pie weights) prevents puffing during baking, but I often just use dried beans in a clean cotton bag for the same effect. 🥄
Precision Cutting Tools
A sharp chef's knife (I use Victorinox Fibrox) and mandoline slicer make apple prep a breeze—uniform slices ensure even cooking. For lattice crusts, a pizza wheel or sharp knife works perfectly for clean cuts.
Don’t skip the bench scraper when transferring dough to your pie dish—it keeps edges crisp and prevents stretching. 🍎
Baking Essentials
An oven thermometer (like Thermoworks) ensures your oven isn’t running hot or cold—this is critical for even baking. A baking sheet underneath catches drips and makes cleanup easier.
For that golden finish, I brush the crust with beaten egg white before baking, but corn syrup (1 tbsp) works in a pinch for extra shine. ⏰
Cooling & Serving
Let your pie cool on a wire rack (never on the counter!) to prevent a soggy bottom. A pie server with a serrated edge makes clean slices effortless. For serving, I love a wooden pie board—it keeps the pie stable and adds rustic charm.
Store leftovers in an airtight container for up to 4 days, or freeze for 3 months. 🍴
Nutrition facts
Frequently asked questions
Can I use frozen apples instead of fresh for the filling?
Thaw frozen apples completely first and pat them dry to remove excess moisture. Use the same amount as fresh apples, but you may need to reduce the sugar slightly (by 1-2 tablespoons) since frozen apples tend to be sweeter. The texture will be slightly different but still delicious.
Why is my crust turning out tough instead of flaky?
Overworking the dough or using warm butter are the most common culprits. Keep your butter cold and pulse it just until it forms pea-sized pieces. Also, avoid adding more than ½ cup ice water—the dough should barely hold together when pressed. Chill it for at least 2 hours before rolling.
How can I make this pie ahead of time?
You can prep the filling 1 day ahead and store it in the fridge. For the crust, make it 2 days ahead and keep it wrapped in plastic in the fridge. Assemble the pie (without baking) and refrigerate for up to 12 hours. Bake it straight from the fridge—just add 10-15 minutes to your baking time.
Can I substitute the cinnamon in the crust with another spice?
While cinnamon is traditional, you could experiment with cardamom (½ tsp) for warmth or orange zest (1 tsp) for brightness. Just remember that cinnamon's sweetness balances the apples perfectly—other spices might alter the flavor profile. Stick with it for the classic taste!
What's the best way to reheat leftover apple pie?
Slice the pie and warm individual portions in a 350°F oven for 8-10 minutes until heated through. For a quick fix, use the microwave (covered with a damp paper towel) on 50% power for 30-45 seconds. Avoid reheating the whole pie—it can make the crust soggy.