
Desserts
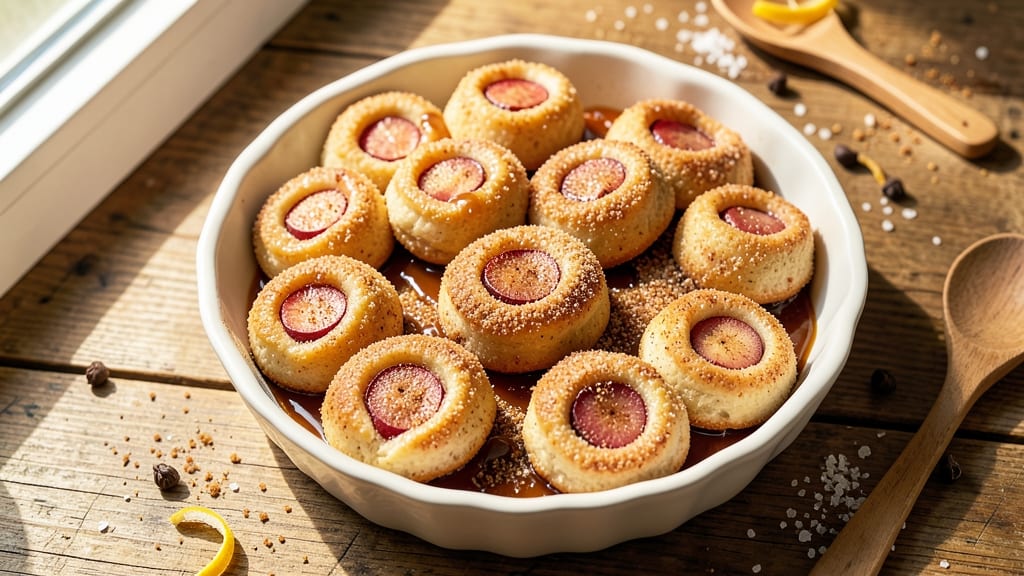
This snickerdoodle apple pie bites recipe transforms a classic dessert into perfect handheld treats—crispy cinnamon-sugar edges hugging tender apple filling, all wrapped in flaky crust.
After years of perfecting bite-sized desserts, I’ve cracked the code for achieving that signature snickerdoodle flavor in mini form, with a texture that’s crisp yet tender. The key lies in the cinnamon-sugar coating, which needs to be applied just before baking to maintain its signature crunch without turning to dust.
What sets these apart is the balance between traditional apple pie and modern convenience. You’ll use a simple pie crust (or gluten-free alternative) and a filling that’s spiced just right—cinnamon, nutmeg, and a touch of brown sugar to caramelize the apples.
The filling bakes until bubbly but still holds its shape, ensuring each bite delivers the perfect mix of sweet and spiced flavors. This recipe delivers restaurant-quality results in a fraction of the time, making it ideal for gatherings, potlucks, or satisfying a sweet craving.
The assembly process is straightforward but requires precision: rolling out the crust thinly, cutting uniform circles, and pressing the filling into each one before dusting with cinnamon sugar. Baking at 375°F ensures the crust stays crisp while the filling remains tender.
The result? Golden-brown, bite-sized desserts that taste like a miniature apple pie but with the convenience of a cookie. These disappear faster than you can say "snickerdoodle," so plan to make a double batch.
For added versatility, you can swap the butter for vegan alternatives or use a pre-made gluten-free crust without sacrificing flavor. The technique scales effortlessly—whether you’re serving a crowd or just craving a single slice. Once you try these, traditional apple pie might never feel the same again. Let’s get baking!
Ingredients for snickerdoodle apple pie bites
Crispy cinnamon edges hugging tender apple filling—these mini bites deliver full pie flavor in perfect handheld size.
| Ingredient | Amount | Notes |
|---|---|---|
| All-Purpose Flour 🌾 | 2 ½ cups | Sifted for light texture |
| Unsalted Butter 🧈 | 1 cup | Cold, cubed for flaky crust |
| Granulated Sugar 🍚 | ½ cup | Plus 2 tbsp for coating |
| Brown Sugar 🍚 | ¼ cup | Packed for filling sweetness |
| Cinnamon 🌶️ | 2 tbsp | Ground, plus extra for coating |
| Ground Nutmeg 🌿 | ½ tsp | Freshly grated preferred |
| Salt 🧂 | ½ tsp | Fine sea salt preferred |
| Apples 🍎 | 4 medium | Peeled, finely diced (e.g., Honeycrisp) |
| Lemon Juice 🍋 | 1 tbsp | Freshly squeezed for brightness |
| Vanilla Extract 🥛 | ½ tsp | Pure, high-quality preferred |
| Cream of Tartar 🧂 | ½ tsp | For crisp cinnamon-sugar |
| Ice Water 💧 | 2 tbsp | For dough consistency |
The apples are non-negotiable here. Honeycrisp or Granny Smith hold their shape best during baking, but any firm variety works. Peeled and finely diced ensures even cooking and maximum caramelization. If you're short on time, Trader Joe's pre-sliced apples (the organic ones) save chopping. The cinnamon-sugar coating is where the magic happens—use Diamond Crystal kosher salt for that perfect balance of sweet and tangy. For the butter, Plugrá or Land O'Lakes unsalted stays cold longer when cubed, which is key for flaky layers.
No cream of tartar? Substitute lemon juice at half the amount—it stabilizes the cinnamon-sugar crystals. Short on apples? Pears work beautifully, but reduce lemon juice to 1 tsp since they're less acidic. The vanilla extract can be swapped for vanilla bean paste if you're feeling fancy (just use half the amount). For the crust, if you're making a double batch, chill the dough for 30 minutes between rolls—prevents shrinking during cutting. And if you're gluten-free? King Arthur's gluten-free flour blend works perfectly for the crust.
These bites freeze beautifully—bake half, freeze the rest for up to 3 months. Reheat at 350°F for 5-7 minutes until crisp. The cinnamon-sugar coating softens when stored, so re-crisp in the oven for 2 minutes before serving. For make-ahead prep, assemble the bites (unbaked) and refrigerate for up to 24 hours—they'll keep their shape better. Double batch? They disappear fast—plan for 24 bites per batch, but honestly, you'll want to make 48.
Why You'll Love This Recipe
- No-Roll Dough Magic: I swear, no one will believe how simple this is—just mix the flour, butter, and sugars until it looks like wet sand. No chilling, no fuss, and the bites come together faster than my coffee cools.
- Cinnamon-Apple Bliss: That warm brown sugar crust with a hint of cinnamon on top? It’s like biting into a snickerdoodle and pie at the same time. The apples stay tender, but the edges get that perfect golden crunch—exactly how I like it.
- Party in a Bite: Honestly, these are my go-to for game day, potlucks, or even a lazy Sunday. Serve them warm with vanilla ice cream, or pack them in a cooler for a picnic. They’re small enough for kids to love, but adults won’t stop reaching for seconds.
- Budget-Friendly Comfort: I make a double batch and freeze half—no waste, just pure convenience. The butter and sugar are the splurge, but the rest? Pantry staples. Plus, they reheat like a dream, so I never run out of an easy dessert.
Step-by-step instructions for snickerdoodle apple pie bites
Here's how to create these irresistible mini desserts with perfect cinnamon-sugar crunch.
Create the Cinnamon-Sugar Coating
In a small bowl, whisk together the 2 tablespoons of cinnamon, 2 tablespoons of the granulated sugar (from the ingredients list), and the 0.5 teaspoon of cream of tartar. This combination creates a perfectly crisp, aromatic coating that clings beautifully to the bites. The cream of tartar is key—it helps the sugar caramelize just enough to create that signature snickerdoodle crunch without burning.
Set this mixture aside for now. We'll use it later to coat the baked bites, but first, we need to prepare the dough and filling. The coating should be fine and evenly mixed—no lumps should remain. If you prefer an extra-sweet topping, you can add an additional 1 tablespoon of granulated sugar to the mix, but I find the original ratio strikes the perfect balance between sweetness and spice.
Make the Pie Dough
In a large mixing bowl, combine the 2.5 cups of all-purpose flour, 0.5 teaspoon of salt, 0.5 teaspoon of ground nutmeg, and the 0.25 cup of brown sugar. Whisk these dry ingredients together until fully incorporated. The nutmeg adds a warm, earthy depth that pairs beautifully with the apples and cinnamon.
Cut the 1 cup of cold, cubed unsalted butter into the dry mixture using a pastry cutter or your fingers. Work quickly to keep the butter cold—this is crucial for achieving a flaky, tender crust. The butter should be distributed in pea-sized pieces throughout the flour. Once combined, add the 0.5 teaspoon of vanilla extract and 2 tablespoons of ice water. Mix gently with a fork or dough scraper until the dough just comes together.
Prepare the Apple Filling
While the dough rests, peel and finely dice the 4 medium apples (about 4 cups when chopped). The smaller the dice, the more evenly the filling will distribute in each bite. Toss the diced apples with the 1 tablespoon of lemon juice to prevent browning and enhance their natural sweetness. The lemon juice also brightens the flavor, cutting through the richness of the butter and sugar.
In a small saucepan, combine the diced apples with the 0.5 cup of granulated sugar remaining from the ingredients list. Cook over medium-low heat for 5-7 minutes, stirring occasionally, until the apples soften slightly but still retain their shape. You want them to release their juices but not turn into a mushy purée. Remove from heat and let cool completely before assembling the bites.
Assemble and Bake the Pie Bites
Preheat your oven to 375°F. Divide the dough into 24 equal portions (about 1 tablespoon each) and roll each into a ball. Place the balls on a parchment-lined baking sheet, spacing them about 1 inch apart. Use the back of a spoon to create a shallow well in the center of each dough ball—this will hold the apple filling.
Fill each well with about 1 teaspoon of the cooled apple mixture. Gently press the dough back over the filling to seal, then roll the entire bite in the cinnamon-sugar coating you prepared earlier. Press the coating firmly into the dough so it adheres well. Bake for 12-15 minutes until the edges are golden brown and the filling is bubbling slightly.
Finish and Serve
Remove the bites from the oven and let them cool on the baking sheet for 5 minutes. The exterior should be crisp, while the interior remains soft and gooey with apple filling. For an extra touch, sprinkle additional cinnamon-sugar on top while still warm—this adds texture and ensures every bite has that classic snickerdoodle flavor.
Serve warm for the best experience. The contrast between the warm, spiced apple filling and the cool, crisp cinnamon-sugar crust is what makes these bites so irresistible. Store any leftovers in an airtight container at room temperature for up to 2 days, though I doubt they'll last that long!
Pro Tips For Making Snickerdoodle Apple Pie Bites
- CHILL THE DOUGH: After mixing your flour, butter, sugar, and cinnamon, wrap the dough in plastic and refrigerate for at least 30 minutes—yes, even if you’re eager to bake. I used to skip this and ended up with dense, uneven bites that didn’t hold their shape. Cold dough behaves better, spreads less, and gives you that perfect tender crumb.
- USE COLD BUTTER: Cut your unsalted butter into small cubes and freeze them for 10 minutes before mixing into the dough. This isn’t just about flakiness—it’s about keeping the texture light. Warm butter melts too fast, and your bites will turn out greasy instead of crisp. Trust me, your future self will notice the difference.
- SKIP THE OVERMIXING: Once you add the flour, stop as soon as the dough comes together. Pressing, folding, or overworking it develops gluten, and your bites will turn out tough instead of buttery. Just mix until the dry bits disappear, then shape quickly. I learned this the hard way after kneading like I was making bread.
- BAKE IN BATCHES: Don’t crowd your pan—space the bites at least 1 inch apart. If you’re short on time, bake one tray at a time instead of overloading. Overcrowding steams the dough, making them soggy. A hot pan and uncrowded bites guarantee that caramelized snickerdoodle flavor you’re after.
Creative variations of this dish
Spiced Pear Twist
Swap apples for 4 cups diced ripe pears (like Bosc or Anjou) and boost the spices with 1 tsp cardamom in the filling. The pears caramelize beautifully, creating a softer, more custard-like texture.
I like to add 1 tbsp honey to the filling for extra depth—it balances the tartness perfectly. 🍐
Caramel Apple Crunch
For a decadent twist, drizzle 2 tbsp caramel sauce (store-bought or homemade) over each bite after baking. Let it cool slightly so it doesn’t melt the cinnamon-sugar coating. Top with crushed pecans for added crunch. This version feels like a mini apple pie and a caramel apple in one bite.
Vegan Snickerdoodle Bites
Use 1 cup vegan butter (like Miyoko’s or Earth Balance) and swap the cream of tartar for ½ tsp lemon juice. The crust stays flaky, and the cinnamon-sugar coating remains crisp.
For extra richness, add 1 tbsp coconut oil to the dough. These taste identical to the original—no one will guess they’re dairy-free! 🌱
Gluten-Free Crust
Replace the all-purpose flour with 2.5 cups King Arthur gluten-free flour blend and add ¼ cup cornstarch for structure. Chill the dough longer (30 minutes) before rolling to prevent cracking.
The bites hold their shape beautifully, and the filling stays just as tender. Trust me, your gluten-sensitive guests will be begging for seconds.
Cinnamon Roll Fusion
Transform these into mini cinnamon rolls by rolling out the dough into a ¼-inch thick rectangle, spreading with ½ cup cream cheese frosting, then sprinkling with cinnamon-sugar. Cut into 24 squares and bake as directed. The result? A bite-sized cinnamon roll with apple pie filling—absolute magic. 🍥
Seasonal Citrus Twist
Add 1 tbsp orange zest to the filling and swap 1 tsp lemon juice for 1 tsp lime juice. The citrus brightens the apples and pairs perfectly with the cinnamon. Garnish with extra zest after baking for a festive touch—ideal for holiday gatherings or spring brunch.
Nutrition facts
Frequently asked questions
Can I make these without a pie crust?
For a cookie-style version, mix 1.5 cups all-purpose flour, 0.5 cup brown sugar, 0.5 cup butter, 1 egg, and 1 tsp cinnamon. Roll into balls, press in filling, then coat with cinnamon sugar. Bake at 350°F for 10-12 minutes. The texture will be more cookie-like but still delicious!
Why did my cinnamon-sugar coating turn to dust?
This happens when the coating gets too humid or the dough isn't fully cooled before rolling. Store your cinnamon-sugar mix in an airtight container with a packet of silica gel. Also, let the baked bites cool completely before handling to prevent moisture from dissolving the sugar. A quick fix: Re-crisp in the oven for 2 minutes at 350°F!
Can I use canned apples instead of fresh?
Yes, but drain them well and pat dry to remove excess moisture. For best results, use unsweetened applesauce mixed with 0.5 cup diced dried apples (rehydrated) and add 1 extra tbsp lemon juice to brighten the flavor. The texture will be slightly softer but still delicious.
How do I store these for maximum freshness?
Keep them in an airtight container at room temperature for up to 3 days. For longer storage, freeze unbaked bites (coated) for 3 months. To reheat: Bake frozen bites at 375°F for 15-18 minutes until golden. The cinnamon-sugar stays crisp when properly stored!
What's the secret to getting the perfect bite size?
Use a 1.5-inch round cookie cutter for consistent shapes. For hand-rolled dough balls, aim for 1 tablespoon each. Press the filling firmly into the center before sealing—this prevents leaks during baking. The key is uniformity in both dough and filling portions!