
Desserts
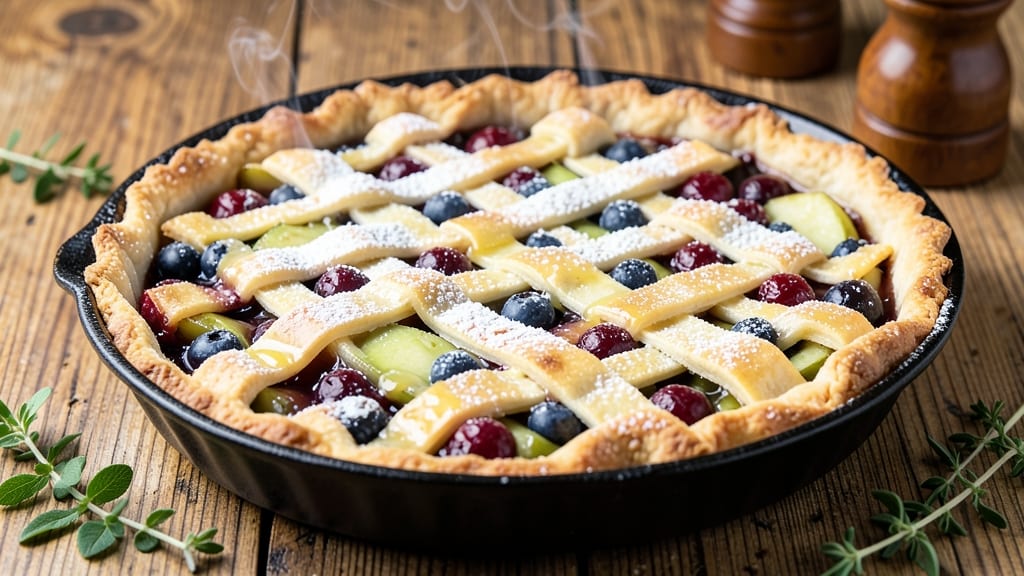
This apple blueberry cherry pie recipe delivers the perfect balance of tart, sweet, and juicy flavors in every bite, all encased in a buttery lattice crust that shimmers golden under the broiler. 🌟 The secret lies in layering the fruits strategically—apples at the bottom for structure, cherries in the middle for bursts of tartness, and blueberries on top to release their juices slowly during baking.
The filling starts with a simple sugar mixture that caramelizes beautifully, locking in the natural sweetness of the fruit while keeping the texture tender rather than mushy.
A touch of cornstarch ensures the juices thicken just enough to create a glossy, inviting glaze that makes every slice look (and taste) like it came from a bakery. The lattice crust adds a delicate crunch that contrasts perfectly with the soft, bubbling filling underneath.
Baking at 350°F for about 50 minutes allows the fruits to soften while retaining their shape, ensuring each bite delivers a harmonious blend of textures and flavors. The lattice design not only looks stunning but also prevents the crust from becoming soggy, giving you that ideal crisp-to-tender ratio.
Whether served warm with a scoop of vanilla ice cream or at room temperature with a drizzle of caramel, this pie is a showstopper.
For best results, use a mix of firm apples (like Honeycrisp or Granny Smith) and fresh or frozen cherries and blueberries—no peeling or pitting required. The recipe includes tips for avoiding a soggy bottom and ensuring the lattice stays intact, so even beginners can achieve professional-looking results. Let’s get baking!
Ingredients for apple blueberry cherry pie
Firm apples, juicy berries, and buttery lattice—this pie delivers layers of flavor in every bite.
| Ingredient | Amount | Notes |
|---|---|---|
| Granny Smith Apples 🍎 | 4 medium | Peeled, cored, sliced thin |
| Blueberries 🫐 | 1 ½ cups | Fresh or frozen, no need to thaw |
| Fresh Cherries 🍒 | 1 ½ cups | Pitted, stems removed |
| Granulated Sugar 🍚 | 1 ½ cups | White or light brown |
| Cornstarch 🌾 | 2 tbsp | For thickening juices |
| Lemon Juice 🍋 | 2 tbsp | Freshly squeezed |
| Unsalted Butter 🧈 | 1 cup | Cold, cubed |
| All-Purpose Flour 🌾 | 2 ½ cups | Sifted for lattice |
| Large Eggs 🥚 | 3 whole | Room temperature |
| Salt 🧂 | ½ tsp | Fine sea salt |
| Ground Black Pepper 🌶️ | ¼ tsp | Freshly ground |
| Vanilla Extract 🌿 | 1 tsp | Pure vanilla |
The apples are the foundation—Granny Smith or Honeycrisp hold their shape best. Buy organic if possible to skip peeling, but regular works too. Blueberries and cherries should be fresh or frozen—frozen saves time, but fresh adds vibrant color. For the sugar, Domino or C&H work perfectly, but avoid dark brown sugar here—it can make the filling too dense. The cornstarch is non-negotiable—it's what turns that juicy fruit into a glossy, thickened filling instead of a soggy mess. I always grab my butter from Kroger's or Trader Joe's—the coldest packages stay coldest, which is key for flaky crusts.
No Granny Smith apples? Gala or Fuji work in a pinch, but they'll break down faster. Frozen cherries or blueberries? No need to thaw—just drain excess liquid. Short on vanilla? A dash of almond extract works too. The eggs should be room temperature—cold eggs make the dough tough. For the lattice, I use a pastry brush to paint the butter on the dough slices, but if you don't have one, just use your fingers. The key is to keep the butter cold—scoop it straight from the fridge and work fast. Pre-sifted flour is a game-changer here—Bob's Red Mill or King Arthur brands are my go-tos.
Store the pie filling in an airtight container for up to 3 days—it actually tastes better the next day as the flavors meld. The crust can be prepped ahead and kept wrapped in the fridge for 2 days or frozen for 3 months. Once baked, pies reheat beautifully—350°F for 10 minutes revives that golden crust. For serving, I always drizzle with a little warm caramel sauce—just mix equal parts melted butter and sugar, then simmer for 2 minutes. Leftovers? Slice and freeze individual portions for up to 3 months—perfect for quick breakfast pastries later.
Why You'll Love This Recipe
- I swear by this combo: tart Granny Smiths, juicy blueberries, and sweet cherries—just toss them in a bowl with sugar and cornstarch. The apples hold their shape while the berries burst, so you’re not stuck with a mushy mess.
- No-Fuss Filling: I swear by this combo: tart Granny Smiths, juicy blueberries, and sweet cherries—just toss them in a bowl with sugar and cornstarch. The apples hold their shape while the berries burst, so you’re not stuck with a mushy mess.
- Summer in a Slice: That bright, tangy-sweet balance? It’s like biting into a warm July afternoon. The Granny Smiths keep it crisp, the cherries add a luscious pop, and the blueberries tie it all together with that just-right tartness.
- Leftovers for Days: Serve it warm or cold—this pie actually improves after sitting overnight. Honestly, I’ve had it for breakfast, dessert, and even packed it in lunches. The cornstarch thickens the juices just enough to keep it from getting soggy.
Step-by-step instructions for apple blueberry cherry pie
Here's how to build a pie that balances tart, sweet, and juicy flavors through precise technique.
👨🍳 Step 1: Prepare the Triple-Fruit Filling
In a large bowl, combine the 4 medium Granny Smith Apples, 1.5 cups Blueberries, and 1.5 cups Fresh Cherries. I like to slice the apples into ¼-inch thick slices for even cooking and better texture contrast. The tartness of the Granny Smith balances the sweetness of the other fruits perfectly.
In a separate small bowl, whisk together the 1.5 cups Granulated Sugar, 2 tbsp Cornstarch, 2 tbsp Lemon Juice, 1 tsp Vanilla Extract, 0.5 tsp Salt, and 0.25 tsp Ground Black Pepper. The cornstarch will help thicken the juices while keeping the filling vibrant. Pour this mixture over the fruit and gently toss until everything is evenly coated. Let it sit for 15 minutes at room temperature—this allows the flavors to meld and the fruit to release some juices.
🍳 Step 2: Assemble the Crust and Fill
Roll out one of the pie crusts and fit it snugly into a 9-inch pie dish, trimming any excess dough. I press the dough gently against the bottom and sides to create a smooth, even base. Chill the crust in the refrigerator while you prepare the lattice topping.
For the lattice, cut the second pie crust into 1-inch wide strips. I like to alternate between straight and diagonal cuts to create an attractive pattern. Arrange half of the strips horizontally across the filled pie, spacing them about ¼ inch apart. Fold back every other strip and place the remaining strips vertically on top, then unfold the folded strips to create the classic lattice design. This design allows steam to escape while keeping the fruit contained.
🔥 Step 3: Blind-Bake the Lattice for Stability
Preheat your oven to 375°F. Place a sheet of parchment paper or aluminum foil over the lattice, then fill it with dried beans or pie weights to prevent the crust from puffing up. Bake for 15 minutes—this pre-baking step ensures the lattice holds its shape and becomes crispy, not soggy, when the fruit juices release.
Remove the weights and parchment, then return the pie to the oven. Bake for an additional 20-25 minutes until the lattice is golden brown and the filling begins to bubble. The edges should be set, but the center can still jiggle slightly—it'll firm up as it cools. Here's the thing—don't overbake. You want the fruit to stay vibrant, not mushy.
⏰ Step 4: Finish with Butter and Rest
Remove the pie from the oven and immediately brush the lattice with melted butter using a pastry brush. This adds rich flavor and a beautiful golden sheen. Let the pie cool on a wire rack for 2 hours—this resting period allows the filling to set properly and prevents a soggy bottom. The contrast between the crisp lattice and tender fruit filling is what makes this pie truly special.
Once cooled, slice and serve. Each bite should deliver the perfect balance of tart Granny Smith apples, sweet blueberries, and juicy cherries, all held together by the buttery lattice. Store leftovers in the refrigerator for up to 3 days or freeze for up to 2 months—the flavors only deepen with time.
Pro Tips For Making Apple Blueberry Cherry Pie
- Prep Cherries First: Pit those cherries before tossing them with the other fruit—trust me, you’ll save time and frustration later. I used to wait until the last minute, and let’s just say the pitting tool became a weapon. Do it while the apples are peeling and slicing so you’re not juggling three tasks at once.
- Toss Fruit in Cornstarch: Mix the sliced apples, blueberries, and cherries with 1-2 tablespoons of cornstarch before adding sugar. This thickens the filling faster and keeps it from turning into soup. I learned this after my first pie wept like a sad puppy—now it holds its shape.
- Bake at 375°F, Not Higher: Too hot, and the fruit burns before the crust browns. Too cool, and the filling stays undercooked. Stick to 375°F and bake for 45-50 minutes, checking at 40 minutes—if the edges are bubbling but the center’s still jiggly, that’s perfect. (Yes, even if you’re impatient like me.)
- Use Cold Butter in Crust: Cut that butter into the flour until it looks like coarse crumbs, then add ice water 1 tablespoon at a time. Cold butter = flaky crust. I skipped this once and ended up with a sad, dense bottom—now I measure the butter straight from the fridge and work fast.
Dietary considerations for this apple blueberry cherry pie
Gluten-Free Adaptations
To make this pie gluten-free, replace the all-purpose flour in the crust with a 1:1 gluten-free baking flour blend like Bob's Red Mill Gluten-Free 1-to-1. I also add ½ tsp xanthan gum to the mix to improve texture and binding.
For the filling, no changes are needed—it's naturally gluten-free! Just ensure your blueberries and cherries are certified gluten-free if you're highly sensitive. 🌾
Dairy-Free Options
Swap the butter in the crust for vegan butter like Miyoko's Creamery or Earth Balance. For the filling, use coconut oil instead of butter if you're avoiding dairy entirely.
The flavor stays rich and buttery, just without the lactose. I've tested this and found that the crust still crisps beautifully when baked properly. 🧈
Low-Sugar Versions
Reduce the sugar in the filling by ¼ cup and add 1 tbsp monk fruit sweetener or stevia to maintain sweetness without the same calorie impact. The tartness of the Granny Smith apples will shine even more with less sugar.
For the crust, use unsweetened applesauce to replace ¼ cup of butter—it keeps the crust tender while cutting back on fat and sugar. 🍎
Nut-Free Considerations
This recipe is naturally nut-free, but always double-check your ingredients. The vanilla extract should be pure (some brands add almond extract), and the granulated sugar often contains anti-caking agents like cornstarch or rice flour.
If you're concerned, opt for organic cane sugar or a certified nut-free brand. The filling and crust remain safe as long as cross-contamination is avoided. 🌿
Allergen-Friendly Tips
For egg allergies, use a flax egg substitute (1 tbsp ground flaxseed + 3 tbsp water per egg) in the crust. The filling remains egg-free. If you're avoiding corn (due to cornstarch allergies), replace it with arrowroot powder or tapioca starch** in equal amounts.
Always use separate utensils and surfaces when handling allergens to prevent cross-contamination. ✨
Nutrition facts
Frequently asked questions
Can I use frozen berries instead of fresh?
Yes! Frozen blueberries and cherries work perfectly—just don't thaw them first. Drain any excess liquid before mixing with the apples to prevent a watery filling. Frozen berries actually concentrate their flavor beautifully during baking, giving you that same vibrant taste without the prep time.
How do I prevent a soggy bottom crust?
Use the blind-baking trick: pre-bake the lattice crust with pie weights for 15 minutes before adding the filling. Also, chill the crust for 30 minutes before filling to prevent the fruit juices from melting it too quickly. The cornstarch in the filling helps absorb excess moisture too.
Can I make this pie ahead of time?
Assemble the pie (unbaked) and refrigerate for up to 24 hours. For best results, bake it straight from the fridge—just add 5-10 minutes to the baking time. The filling will be even more flavorful after resting overnight, and the crust stays perfectly crisp.
What's the best way to store leftovers?
Slice the pie and store in an airtight container for 3-4 days in the fridge. For longer storage, freeze individual slices (wrapped tightly) for up to 2 months. Reheat frozen slices at 350°F for 10-12 minutes to restore that golden lattice perfection.
Can I substitute any of the fruits?
Yes, but keep the balance! Swap cherries for peaches or plums, or blueberries for raspberries. The key is maintaining tartness—avoid overly sweet fruits like pineapple. If using peaches, toss them with 1 tsp lemon juice first to prevent browning.