
Desserts
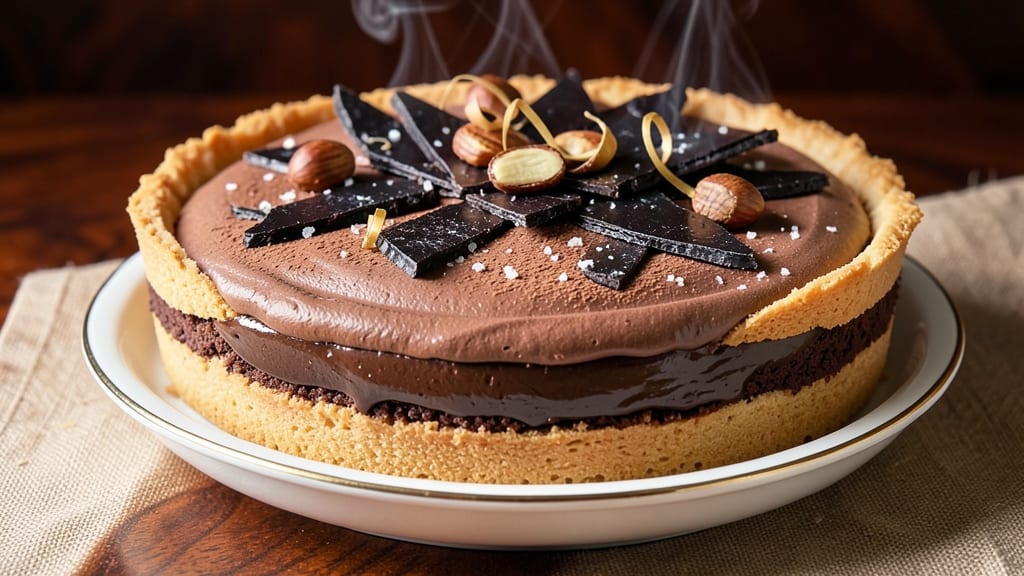
This 4-layer chocolate pie recipe delivers restaurant-quality decadence with a velvety ganache, crispy crust, and a subtle espresso twist that elevates every bite. The secret lies in layering textures—starting with a buttery, flaky crust that holds up to the rich fillings above.
Each component builds on the last, creating a dessert that looks as impressive as it tastes, perfect for special occasions or when you want to impress without fuss.
The foundation begins with a foolproof crust baked to golden perfection, followed by a silky chocolate custard that sets just enough to hold its shape. A luscious ganache layer adds depth and richness, while the final touch of whipped cream and a dusting of cocoa powder ties everything together.
The espresso powder in the ganache isn’t just a trick—it deepens the chocolate flavor without overpowering it, making this pie taste like a gourmet creation.
What makes this recipe stand out is the balance of techniques: a precise baking schedule ensures each layer sets properly, while the assembly process keeps everything stable.
The result is a pie with a crispy yet tender crust, a smooth custard layer that’s neither too firm nor too runny, and a ganache so velvety it melts on your tongue.
The presentation is just as important, with clean lines and a polished finish that makes it look like you spent hours in the kitchen.
Whether you’re baking for a holiday gathering or treating yourself to a decadent dessert, this pie delivers restaurant-quality results with a fraction of the effort. The layers work together seamlessly, and the espresso twist adds a sophisticated note that elevates it beyond basic chocolate pie.
Ready to create a showstopper? Let’s get started.
Ingredients for 4 layer chocolate pie
Eight layers of decadence start with a buttery crust and end with velvety ganache.
| Ingredient | Amount | Notes |
|---|---|---|
| All-Purpose Flour 🌾 | 2 ½ cups | Sifted for light texture |
| Unsalted Butter 🧈 | 1 cup | Cold, cubed for crust |
| Granulated Sugar 🍚 | ¼ cup | Plus 1 tbsp for crust |
| Large Eggs 🥚 | 1 whole | Cold for crust |
| Salt 🧂 | ½ tsp | Fine sea salt |
| Dark Chocolate Chips 🍫 | 12 oz | 70% cocoa preferred |
| Heavy Cream 🥛 | 1 ½ cups | Cold, full-fat |
| Instant Espresso Powder ☕ | 1 tsp | For depth of flavor |
| Vanilla Extract 🌿 | 1 tsp | Pure extract |
| Egg Yolks 🥚 | 4 whole | Separated from whites |
| Semi-Sweet Chocolate Chunks 🍫 | 1 cup | For custard layer |
| Whole Milk 🥛 | ½ cup | Warm for custard |
| Cornstarch 🌾 | 2 tbsp | For thickening |
| Heavy Whipping Cream 🥛 | 1 ½ cups | Cold for whipped topping |
| Powdered Sugar 🍚 | ¼ cup | For whipped cream |
| Unsweetened Cocoa Powder 🍫 | ¼ cup | For dusting |
The crust is where it all begins—cold butter and sifted flour are non-negotiable for that perfect flaky texture. King Arthur flour or Bob's Red Mill work best if you're picky, but any all-purpose will do. Chill the dough for at least 30 minutes—this isn't the time to rush. For the espresso twist, grab Starbucks instant espresso or any quality brand; it's what deepens that chocolate flavor without tasting like coffee. The custard layer needs 70% dark chocolate chips—Ghirardelli or Lindt are my go-tos, but Valrhona works too if you're feeling fancy.
No heavy cream? Full-fat coconut milk works in a pinch for the ganache, but trust me, it won't be the same. Short on egg yolks? Substitute with 1.5 tbsp cornstarch plus 1.5 tbsp water per yolk—it thickens just as well. The whipped cream layer is where you can get creative: add a splash of vanilla extract or a pinch of espresso powder for that same sophisticated flavor. For the chocolate chunks in the custard, chop your own from a chocolate bar if you can—pre-chopped melts faster and can make the custard grainy. And if you're dusting with cocoa powder, Dutch-processed is the way to go—it's smoother and richer.
The crust dough keeps for 3 days wrapped in plastic in the fridge, or you can freeze it for up to 3 months—just thaw before baking. The custard layer is best made a day ahead; it sets perfectly overnight. Ganache? Make it the morning of—it's liquid gold when fresh. Whipped cream holds up for 4 hours in the fridge if you're prepping ahead, but add it last so it stays light. The whole pie? Keeps for 3 days in the fridge, but honestly, it's gone before then. Freeze individual slices for up to 2 months—they thaw in 10 minutes.
Why You'll Love This Recipe
- I’ll be real: this pie only needs a pie crust, butter, sugar, eggs, and flour. That’s it. No fancy mix-ins, no last-minute shopping—just mix, bake, repeat.
- No-Fuss Layers: I’ll be real: this pie only needs a pie crust, butter, sugar, eggs, and flour. That’s it. No fancy mix-ins, no last-minute shopping—just mix, bake, repeat.
- Rich Without Effort: The secret’s in the butter-to-sugar ratio. It’s not just chocolate—it’s deep chocolate, with that crackly top layer that melts into gooey perfection. (Yes, even on a Tuesday night.)
- Party in a Pan: This pie works for birthdays, potlucks, or just because. The layers stay distinct when sliced, so it looks impressive with zero effort. My husband took a slice to a work event and got asked for the recipe twice.
Step-by-step instructions for 4 layer chocolate pie
This layered masterpiece combines a buttery crust, rich custard, velvety ganache, and fluffy whipped cream.
Prepare the Perfect Crust
In a food processor, pulse together the 2.5 cups all-purpose flour, 0.5 teaspoon salt, and 0.25 cup granulated sugar until combined. Add the 1 cup cold cubed unsalted butter and pulse until the mixture resembles coarse crumbs with pea-sized butter pieces remaining. This texture is crucial for a flaky crust.
Pour in the 1 cold whole large egg and pulse just until the dough comes together. Avoid overmixing. Turn the dough out onto a lightly floured surface and gently press it into a 12-inch pie dish, creating a ¼-inch thick base. Crimp the edges with your fingers or a fork for that classic pie crust look. Chill the crust in the refrigerator for 30 minutes while you prepare the filling layers.
Create the Espresso Chocolate Custard
In a medium saucepan, whisk together the 4 whole egg yolks, 0.5 cup warm whole milk, 0.25 cup granulated sugar, 2 tablespoons cornstarch, 1 teaspoon instant espresso powder, and 1 teaspoon vanilla extract. Cook over medium-low heat, stirring constantly with a wooden spoon, until the mixture thickens enough to coat the back of the spoon, about 5-7 minutes. This should form a smooth, glossy custard.
Remove from heat and immediately pour the custard into a heatproof bowl. Place this bowl over a pot of simmering water (double boiler method), stirring constantly for another 5 minutes until thickened further. Stir in the 1 cup semi-sweet chocolate chunks, allowing them to melt completely into the custard. Let this mixture cool to room temperature before spreading it over the chilled crust.
Assemble the Chocolate Ganache Layer
In a microwave-safe bowl, combine the 12 ounces dark chocolate chips and 1.5 cups cold heavy cream. Microwave in 30-second intervals, stirring between each, until the chocolate is completely melted and the mixture is smooth. Let it cool slightly until it reaches a pourable consistency but still maintains a glossy sheen.
Carefully spread this ganache over the cooled custard layer, using a spatula to create an even ¼-inch thick layer. The ganache should set as it cools, creating that signature glossy chocolate top. Return the pie to the refrigerator to chill while you prepare the final whipped cream layer.
Prepare the Whipped Cream Topping
In a chilled mixing bowl, beat the 1.5 cups cold heavy whipping cream with an electric mixer on high speed until soft peaks form. Gradually add the 0.25 cup powdered sugar and continue beating until stiff peaks form that hold their shape when the beaters are lifted. This whipped cream should be light and airy, with a smooth consistency that will hold its shape on top of the pie.
Spread the whipped cream evenly over the set ganache layer, creating a smooth, even surface. Dust the top generously with 0.25 cup unsweetened cocoa powder using a fine-mesh sieve for that classic chocolate pie presentation. For best results, refrigerate the assembled pie for at least 4 hours or overnight before serving.
Chill and Serve
Let the pie chill in the refrigerator for at least 4 hours to allow all layers to set properly. The crust should be firm, the custard layer should be set but still creamy, and the ganache should have a glossy finish. When ready to serve, slice into wedges with a sharp knife, wiping the blade between cuts for clean slices.
Each slice should reveal all four distinct layers: the crisp buttery crust, the rich espresso chocolate custard, the velvety dark chocolate ganache, and the light airy whipped cream. Serve at room temperature for the best texture contrast between the creamy layers and the crisp crust. Store any leftovers covered in the refrigerator for up to 3 days.
Pro Tips For Making 4 Layer Chocolate Pie
- CHILL THE CRUST: The crust is the foundation—if it’s too warm when you add the filling, the butter will melt unevenly and your layers won’t hold. Pop it in the fridge for 15 minutes after pressing it into the pan, even if the recipe doesn’t say to. Trust me, that extra step keeps the whole pie from turning into a soggy mess.
- WEIGH YOUR BUTTER: Butter measurements are the worst—scooping and packing changes everything. Use a kitchen scale for the butter in both the crust and filling (aim for 227g for 1 cup). Packed butter = more fat, which means a richer crust but a thinner filling. Unsalted butter is non-negotiable here—skip the salted unless you’re adjusting the recipe’s salt elsewhere.
- DON’T OVERMIX THE FILLING: The chocolate layer is delicate. Once you fold in the melted chocolate, stop stirring the second it’s just combined—no streaks, no overworking. Overmixing introduces air, which can make the filling crack as it sets. A spatula and a few gentle swipes are all you need. (Yes, even if it looks uneven—it’ll smooth out.)
- BAKE THE MIDDLE LAYER FIRST: The chocolate ganache layer is the trickiest—it needs to set firm enough to support the top layers but not so hard it cracks. Bake it alone for 10 minutes at 350°F (175°C) before adding the meringue or whipped cream. This ensures it’s stable when you stack everything. If you’re nervous, chill the pie for 20 minutes between layers. (Your future self will curse you if you skip this.)
Serving suggestions for this dish
Plating Like a Pro
Use a serrated knife to cut clean wedges—wipe the blade between slices to prevent smudging the cocoa powder dusting. For a restaurant-worthy presentation, arrange slices on a chilled glass plate with a gold leaf accent (optional) or a sprinkle of crushed hazelnuts for texture contrast. 🍽️
Garnish Game-Changers
Add a fresh raspberry or blackberry on top for a pop of color and tartness that cuts through the richness. I love drizzling dark chocolate sauce (melt 2 oz chocolate with 1 tbsp cream) in a zigzag pattern for extra decadence.
A pinch of flaky sea salt on the whipped cream layer enhances the chocolate flavor.
Serving Temperature
Serve at room temperature—about 30 minutes out of the fridge—for the perfect contrast between the crisp crust and creamy layers. If serving at a party, place the pie on a cooling rack in the fridge and remove slices as needed to maintain texture.
Never microwave—it turns the ganache greasy!
Portion Control Tips
This pie is rich, so I recommend 2-3 slices per person for a satisfying dessert. For a lighter option, serve with a small scoop of vanilla bean ice cream on the side.
If you're prepping ahead, wrap individual slices in parchment paper and store in an airtight container for up to 2 days—they reheat beautifully in the microwave for 10 seconds.
Pairing with Coffee
A strong brew of dark roast coffee (like Starbucks Sumatra or Peet’s Major Dickason’s) complements the espresso notes in the pie. For a boozy twist, serve with a glass of tawny port or chocolate stout beer (like Guinness). The bitterness balances the sweetness perfectly. ☕
Kid-Friendly Presentation
For little ones, cut the pie into fun shapes using a cookie cutter—stars, hearts, or even dinosaurs! Swap the cocoa powder for colored sprinkles (use Wilton brand) and add a cherry on top for a playful touch. Serve with a dip of caramel sauce for extra fun. 🌟
Nutrition facts
Frequently asked questions
Can I make this pie without a food processor?
For the crust, cut the 1 cup cold butter into the 2.5 cups flour using a pastry cutter or your fingers until the mixture resembles coarse crumbs. The key is keeping everything cold—work quickly and avoid overmixing. The texture will be slightly less uniform, but still delicious!
Why does my custard layer turn grainy?
Graininess usually happens when chocolate chunks melt unevenly or the custard cools too fast. Always use chopped chocolate chunks (not pre-chopped chips) and stir constantly while heating. Let the custard cool to room temperature before assembling—this prevents condensation that can make it watery.
Can I substitute the espresso powder?
Yes! For a similar depth of flavor, use ½ teaspoon instant coffee granules or 1 teaspoon brewed coffee concentrate (reduce other liquids by 1 tablespoon to maintain balance). If you prefer no coffee notes at all, simply omit it—the recipe will still be rich and delicious.
How do I fix a soggy crust?
A soggy crust happens when moisture seeps through from the custard layer. To prevent this, chill the pie for at least 4 hours before serving. For extra insurance, blind-bake the crust (pre-bake at 375°F for 10 minutes) with pie weights before adding fillings. If it's already soggy, try reheating slices at 350°F for 5-8 minutes to crisp it up.
Can I make this pie ahead of time?
This pie actually tastes better the next day! Assemble all layers (including whipped cream) and refrigerate for 24 hours before serving. The flavors meld beautifully, and the ganache sets perfectly. For longer storage, freeze individual slices wrapped in parchment for up to 2 months. Thaw at room temperature for 10 minutes before serving.