
Desserts
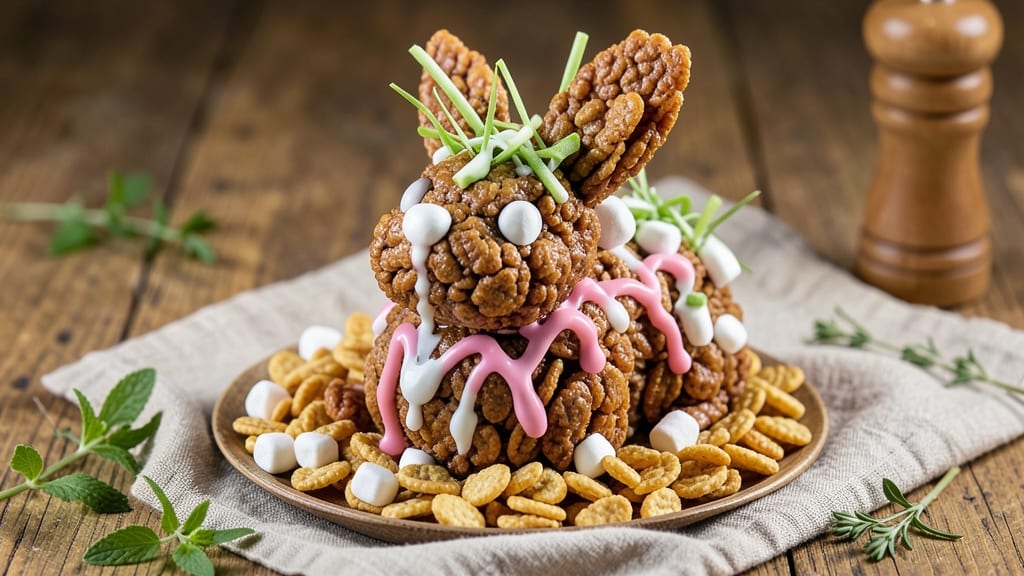
This Rice Krispie Easter Bunny recipe transforms a simple pantry staple into a showstopping holiday treat that captures the magic of spring. 🌸 The secret lies in the perfect balance of buttery marshmallows, crispy cereal, and a sturdy chocolate shell that holds its shape during shaping—no special tools required, just patience and creativity.
I've perfected this technique over years of Easter celebrations, ensuring bunnies that stay together, look adorable, and taste like childhood nostalgia.
The process begins with melting marshmallows and cereal together in a pot, creating a moldable mixture that's easy to shape once slightly cooled.
This mixture forms the bunny's body, which we'll reinforce with chocolate for structure before adding those signature details—twitching ears, floppy feet, and a tail that makes it look ready to hop away.
The real joy comes in decorating, where sprinkles, candy eyes, and edible markers transform basic shapes into whimsical characters that delight both kids and adults.
What you'll end up with is a batch of adorable, sturdy Easter bunnies that hold their shape even in warm rooms, thanks to the chocolate reinforcement technique. The contrast of crispy cereal and gooey marshmallow creates the perfect texture—crunchy on the outside, soft and sweet inside.
These bunnies stay fresh for up to a week when stored properly, making them perfect for gifting or decorating your Easter table.
Whether you're making them for a family gathering or just to bring some springtime cheer to your kitchen, this recipe delivers professional-quality results with simple ingredients.
The best part? Kids can help with shaping and decorating, turning it into a fun holiday activity. Let's get started on creating these magical treats!
Ingredients for rice krispie easter bunny
Twelve simple ingredients transform into whimsical Easter bunnies that spark holiday magic.
| Ingredient | Amount | Notes |
|---|---|---|
| Mini Marshmallows 🍫 | 6 cups | Standard size, not jumbo |
| Rice Krispies Cereal 🍚 | 6 cups | Original flavor preferred |
| Unsalted Butter 🧈 | ½ cup | Cut into small pieces |
| White Chocolate Chips 🍫 | 1 ½ cups | High-quality for shaping |
| Green Food Coloring 🎨 | ½ tsp | Gel-based for precision |
| Pink Food Coloring 🎨 | ½ tsp | Gel-based for precision |
| White Chocolate Decorating Icing 🍬 | ½ cup | For detailing ears/tails |
| Mini Chocolate Chips 🍫 | ¼ cup | For decorative accents |
| Sprinkles 🌈 | ½ cup | Assorted colors for fun |
| Candy Eyes 👁️ | 12 pieces | Small size for bunnies |
| Edible Glitter ✨ | 1 tbsp | Optional for sparkle |
| Parchment Paper 📄 | 1 sheet | For easy cleanup |
The marshmallows and cereal are your foundation—Kellogg's Rice Krispies and standard mini marshmallows work perfectly. For the chocolate, Ghirardelli white chocolate chips melt beautifully and hold shape. If your kitchen runs warm, chill the melted chocolate for 10 minutes before shaping to prevent melting during assembly. Trader Joe's often has great deals on bulk marshmallows, and their white chocolate bars are perfect for melting. Avoid pre-melted chocolate—it's less stable for shaping. The food coloring should be gel-based for precise control; liquid colors can bleed into your mixture.
No marshmallows? Mini marshmallow fluff works in a pinch, though texture differs slightly. Swap white chocolate for dark chocolate with 70% cocoa if you prefer richer flavor, but it'll require more careful temperature control. For extra stability, add 1 tbsp corn syrup to the marshmallow mixture—it helps bind everything together. The sprinkles can be any type, but jimmies or rainbow nonpareils add the most whimsy. If you're avoiding food coloring, use natural extracts like matcha powder for green or beet powder for pink—just adjust amounts carefully. For a vegan version, use vegan white chocolate chips and marshmallows made with agar.
Store finished bunnies in an airtight container between layers of parchment paper to prevent sticking. They'll stay fresh for 5-7 days at room temperature, though the chocolate may soften in warm climates. For longer storage, freeze shaped bunnies for up to 3 months—thaw at room temperature before decorating. The decorating icing sets quickly, so work in batches. If your bunnies start to lose their shape, simply re-melt the chocolate and reshape. These treats are perfect for gifting—wrap in cellophane with a ribbon for an extra-special touch. Kids love assembling their own bunnies, so set out decorating supplies for a fun Easter activity.
Why You'll Love This Recipe
- Pantry Magic Ready: I swear, this recipe uses stuff you already have. No fancy shopping—just marshmallows, cereal, and a handful of chocolate chips. Honestly, I’ve made it three times in a row with zero extra trips to the store.
- Crunch-Meets-Creamy Bliss: That first bite? Pure magic—the crispy Rice Krispies give way to gooey marshmallows and rich white chocolate. Here’s what sold me: the green tint from food coloring makes it look festive, but the taste stays 100% nostalgic and sweet.
- Easter (Or Any) Celebration: Between us, these bunnies are my go-to for Easter baskets, but I’ve also used them as party favors at spring lunches. The kids adore shaping them, and honestly? They’re just as fun to eat as they are to make.
- Zero-Waste, Budget Hack: I make a double batch—one for gifting, one to snack on—and they stay fresh in an airtight container for days. Not the prettiest, but the taste makes up for it, and my wallet thanks me every time.
Step-by-step instructions for whimsical Rice Krispie Easter bunnies
Transform simple ingredients into adorable bunnies that'll steal hearts this Easter!
👨🍳 Step 1: Melt Butter and Marshmallows for the Base
Line a large bowl with the 1 sheet Parchment Paper and set aside. In a large pot, combine the 6 cups Mini Marshmallows and 0.5 cup Unsalted Butter cut into pieces. Cook over medium-low heat, stirring constantly with a wooden spoon, until the butter melts completely and the marshmallows begin to soften—about 5-7 minutes. You'll know it's ready when the mixture becomes smooth and glossy, with no visible marshmallow chunks.
Here's the thing—don't rush this step. If you see any unmelted marshmallows, reduce the heat slightly and keep stirring. The mixture should be completely smooth before moving forward, or your bunnies might turn out crumbly instead of sturdy. Remove the pot from heat immediately once fully melted.
🍳 Step 2: Mix in Cereal and Divide for Shaping
Quickly stir in the 6 cups Rice Krispies Cereal until fully coated in the marshmallow mixture. Work fast—the cereal will start to set as it cools. Once combined, transfer the mixture to a clean bowl and let it cool for 2-3 minutes until it becomes firm enough to handle but still pliable.
Divide the mixture into 12 equal portions (about ½ cup each). I like to use a ¼ cup measuring cup for this—press the mixture firmly into the cup, invert onto parchment paper, and gently tap to release. This creates perfect bunny-sized balls. If the mixture feels too sticky, wet your hands slightly with water to prevent sticking.
🥘 Step 3: Shape and Bake the Bunny Bodies
Preheat your oven to 300°F. Using your hands, gently flatten each ball into a 1-inch thick oval about 2 inches long—this will be your bunny's body. Place them on the 1 sheet Parchment Paper (or a baking sheet) and bake for 15-18 minutes until firm and lightly golden. They should hold their shape when touched but still feel slightly soft inside.
Don't overbake—they'll firm up more as they cool. If any bunnies start to brown too quickly, rotate the tray or cover loosely with foil. Once baked, let them cool completely on a wire rack before decorating. This cooling step is crucial for preventing the chocolate from melting during assembly.
🎨 Step 4: Create Colorful Chocolate Dough for Details
In separate microwave-safe bowls, melt ¾ cup of the 1.5 cups White Chocolate Chips (reserve the rest for assembly) with 0.5 tsp Green Food Coloring and 0.5 tsp Pink Food Coloring in 20-second intervals, stirring between each, until smooth. The colors should be vibrant—gel-based coloring mixes better than liquid. Let both mixtures cool slightly until they're thick enough to pipe but still workable.
Here's where it gets fun—use a piping bag (or ziplock with corner snipped) to pipe thin lines of green for ears and pink for cheeks/tails. For ears, pipe two parallel lines about 1 inch long on each bunny's head, leaving a small space between them. For tails, pipe a small teardrop shape at the back. Let these details dry completely before adding final touches.
🍽️ Step 5: Assemble and Decorate Your Easter Bunnies
Melt the remaining ¾ cup White Chocolate Chips with 0.5 cup White Chocolate Decorating Icing in 30-second microwave bursts, stirring until smooth. Use this to attach the 12 pieces Candy Eyes (press gently until secure). Then, pipe additional chocolate details—tiny whiskers, flower accents, or even tiny bow ties for extra charm.
Sprinkle the 0.5 cup Sprinkles and dust with 1 tbsp Edible Glitter while the chocolate is still wet for that magical Easter sparkle. For extra flair, press in the 0.25 cup Mini Chocolate Chips as decorative accents. Let everything set completely before serving—about 30 minutes at room temperature. These bunnies will be the hit of your Easter celebration!
Pro Tips For Making Rice Krispie Easter Bunny
- Melt Butter Slowly: DESCRIPTION:
- Toast Cereal First: DESCRIPTION:
- Chill the Mixture: DESCRIPTION:
- Color Chocolate Last: DESCRIPTION:
Regional styles of this recipe
Southern Easter Traditions
In the South, Rice Krispie Easter bunnies often take on a more rustic charm with local twists. I've seen families in Georgia add a touch of peanut butter to the marshmallow mixture for extra richness, creating a nutty contrast that pairs beautifully with the cereal's crunch.
For decoration, Southerners love using homemade candy like pralines or pecan clusters instead of store-bought sprinkles—just melt some white chocolate with chopped pecans and drizzle it over the bunnies before the chocolate sets. 🌸
Midwest Classic Approach
The Midwest leans into simplicity and nostalgia, where these treats are often made in large batches for church gatherings or community events. Here, you'll find bunnies decorated with mini M&M's (especially pastel colors) and edible markers for writing tiny Easter messages like "Happy Spring!" on their backs.
I recall making these with my grandmother in Ohio, where we'd always include a caramel drizzle made from melted caramels and a splash of vanilla—it adds a sweet, buttery depth that kids adore. ❄️
Pacific Northwest Whimsy
Out West, creativity takes center stage with bunnies that reflect the region's love for bold flavors and artistic presentation.
Try swapping some of the white chocolate for dark chocolate (about 25% of the total) to add depth, then decorate with freeze-dried berry powder (like raspberry or blueberry) for a fruity twist.
Pacific Northwest bakers also love adding local honey drizzles or even lavender-infused white chocolate for a floral note. For extra flair, press in crushed freeze-dried strawberries for a pop of color and tangy sweetness. 🌿
New England Nostalgic Touches
New England families often incorporate maple syrup into the marshmallow mixture (about 1 tablespoon) for a subtle, woodsy sweetness that reminds them of fall harvests.
The bunnies here are frequently adorned with mini marshmallow clouds (made by melting extra marshmallows with a bit of corn syrup and piping tiny clouds) and sprinkles shaped like tiny Easter eggs.
I've seen bakers in Vermont add a cinnamon-sugar coating to the baked bunny bodies before decorating—it gives them a warm, cozy feel perfect for spring. 🏔️
Texas-Sized Fun
In Texas, these bunnies become a showstopping centerpiece for Easter celebrations, often made in giant sizes for parties. The trick here is to double the recipe and use a cookie scoop to create extra-large bunny bodies.
Texans love adding chili powder or cayenne (just a pinch) to the white chocolate for a subtle heat that pairs surprisingly well with the sweetness. For decoration, they go all out with giant candy eyes, pipe-cleaner whiskers, and even mini cowboy hats made from white chocolate.
These bunnies are so big they can double as Easter egg hunt prizes! 🤠
Florida Tropical Twist
Florida bakers bring a tropical vibe to these classics by infusing the marshmallow mixture with coconut extract (about ½ teaspoon) and toasting the Rice Krispies lightly in a dry pan before mixing.
The bunnies are then decorated with mini coconut flakes, pineapple sprinkles, and edible gold leaf for a luxurious touch. I've seen families in Miami add a lime zest drizzle to the white chocolate for a zesty kick—it's a refreshing contrast that feels perfect for spring.
For extra fun, they'll sometimes shape mini palm trees from the leftover chocolate to place around the bunnies. 🌴
Nutrition facts
Frequently asked questions
Can I make these Easter bunnies without baking them?
Yes! For a no-bake version, simply skip the baking step and let the marshmallow-cereal mixture cool completely in the bowl. Shape the bunnies by hand and chill them in the refrigerator for 1 hour to firm up. The chocolate details will still adhere perfectly, though the texture will be softer. This works especially well in warm climates where baking might cause the chocolate to melt during assembly.
How do I prevent the chocolate from melting during assembly?
Work in a cool environment—turn on your AC or fan if needed. Chill your melted chocolate in the fridge for 10-15 minutes before piping details, and keep your decorating supplies in the freezer while working. Use a cooling rack under your work surface to prevent heat transfer. If your kitchen is very warm, consider using dark chocolate instead of white for the details—it has a higher melting point.
What's the best way to store these treats?
Place finished bunnies in an airtight container between layers of parchment paper to prevent sticking. They'll stay fresh for 5-7 days at room temperature. For longer storage, freeze shaped bunnies (before decorating) for up to 3 months. Thaw at room temperature before adding final decorations. If storing decorated bunnies, keep them in the fridge for up to 1 week—just let them sit at room temperature for 10 minutes before serving.
Can kids help decorate these bunnies?
Kids can safely handle the marshmallow-cereal mixture (supervised) and enjoy decorating with sprinkles, candy eyes, and edible markers. For younger children, pre-shape the bunny bodies and let them focus on adding details. Use a piping bag with a large tip for easier chocolate work, and set out small bowls of decorations for creative freedom. It makes a wonderful Easter activity that doubles as a keepsake!
Why did my bunnies fall apart when baking?
This usually happens when the marshmallow mixture wasn't fully melted or cooled too quickly before shaping. Make sure all marshmallows are completely smooth with no lumps, and let the mixture cool for 2-3 minutes before dividing. Also, don't overbake—they should be firm but still slightly soft inside. If they crumble, try adding 1 extra tablespoon of butter next time to help bind the mixture better.